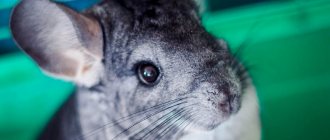
Chinchillas, like other rodents, love cozy, warm hammocks that resemble minks. Pet stores offer a huge selection of hanging beds, but most breeders prefer to make hammocks with their own hands, especially since it is not at all difficult to do.
A hammock for a chinchilla can be sewn from various materials - jeans, fleece, felt and any other piece of fabric you have at home.
You will learn how to make a hammock for a chinchilla with your own hands from this article.
Hammock design
The design of a hammock for a chinchilla is simple. In the classic version, this is a piece of durable but pleasant-to-touch material, the corners of which are securely attached to the cage bars using carabiners or other fasteners.
Fabric structures differ favorably from other types in that they take a shape that matches the contours of the animal’s body, thereby providing maximum convenience and comfort. But if the animal gnaws its bed, you should choose other - more durable - materials.
As for the types of construction, there are two main types:
- single-tier (simple flat bed);
- two-tier or pipe-shaped (a volumetric hammock - the animal can be placed both on top and inside; climbing to the lower tier, the animal finds itself in a “house” - reliable and warm).
Hammock made from jeans
The easiest option is to use old jeans. It is enough to cut the trouser leg to the desired size and secure it with fittings.
The simplest hammock for a chinchilla can be made from jeans with your own hands.
You can make a two-story hammock out of jeans. This requires additional fasteners.
For two chinchillas it is more convenient to make a two-story hammock
Requirements for a hammock
A chinchilla hammock, regardless of its type, must meet certain requirements. Otherwise, the use of such a device will harm the health of the fluffy.
Rules that must be followed when creating a hammock for a pet:
- The size of the hammock should correspond to the dimensions of the chinchilla. There is no point in saving material or, conversely, making a bed that is too large. The best option is a hammock 1.5-2 times larger than the size of the pet.
- If the structure is fabric, then the material should be chosen as environmentally friendly and harmless, as well as durable and not too stretchy (so that the structure does not tear or sag under the weight of the animal). Fabrics such as fleece, cotton, denim, etc. work well.
- The use of fabric materials with a slippery surface or that are easily torn when creating a hammock is strictly prohibited. Such materials include satin, silk, satin, etc. The fragile fabric will tear apart under the weight of the animal or from its claws. And the pet will simply slide off the smooth material. In addition, every time the animal moves on a slippery surface, static electricity will be generated, as a result of which the animal will regularly be subjected to micro-shocks.
- You should prefer metal fasteners - carbines, rings, eyelets, chains or simple wire. The main thing is that there should be no sharp parts on the fasteners. The use of strong laces or ribbons is not prohibited, but it is worth considering that the animal is capable of chewing through them, as a result of which it will fall off the lopsided hammock. It is also acceptable to use durable elastic bands - unlike chains and laces, they have shock absorption, which the animal will definitely like.
When hanging the structure in a cage, it is worth considering the distance to the bottom and to the roof - the hammock should not be located too high, and also directly under the roof - the animal should have enough free space.
How to hang it in the country house?
The ideal solution for attaching a hammock at the dacha would be two trees located nearby, but they are not always present, so you can make the support yourself. To do this, you can use metal poles with a cross-section of about 8 cm; it is recommended to bury them 80-100 cm into the ground and fill them with concrete for greater strength.
A suitable height for hanging is 1-1.5 meters. The distance between the support points is directly related to the length of the hammock. The length of the fabric, plus 30 centimeters for deflection, is the ideal distance between the support points. It should be borne in mind that the higher the hammock is, the larger it should be.
If for some reason it is not possible to install the poles or there is a need to periodically move the hammock, you can buy a ready-made frame or make it yourself from metal.
Hammock for chinchillas eating their bed
If an animal chews on a fabric hammock, you should replace it with a hanging bed made of a different material. Suitable for production:
- Hemp rope (the fabric is knitted from it and installed in the cage according to the principle of a regular fabric hammock).
- Wooden planks (they are assembled onto one rope like a bracelet, and the holes should be at both ends, and not in the middle; the result is a tunnel (it is important to make sure that its width corresponds to the dimensions of the animal), which is suspended in a cage like a swing).
Patterns
It's easy to make the pattern yourself. The simplest rectangular hammock is made like this:
- The first stage of work is cutting. We cut out 2 pieces of fabric measuring 45x45 cm, fold them with the wrong side inward. You can fold a fabric measuring 90x45 cm in half;
- We process the edges on the outside with edging tape;
- We make loops from tape at the corners; they will serve as fastenings for carabiners;
- We hang the product from the roof of the cage.
You can make a hammock without using edge tape. To do this, fold the cut parts with the front side inward and sew along the contour.
Be sure to leave a small area on the side unsewn, through which turn the product right side out. Secure the opening with hidden stitches. Place a finishing stitch along the contour: it will further strengthen the edges. Pierce the ends of the hammock and thread the wire through them. Attach it to the product in a place accessible to the chinchilla.
Making a running wheel for chinchillas.
Advantages and disadvantages
The hammock is simple and easy to use, but the main thing is that you don’t need to accustom your cat to it.
She will immediately understand that lying in a warm nest that takes the shape of her body is more comfortable than lying on a hard, flat surface. The undeniable advantage of the compact model is the ability to free up space that was previously occupied by a bed made from scrap materials. A hammock will come in handy at any time of the year. In winter, the cat will bask in it, and in summer, it will escape the heat next to the cold metal. Owners will be relieved of the need to frequently clean furniture and clothing from adhering wool. If the hammock is temporarily not needed, it can be easily removed and stored .
Such products also have disadvantages, and it is better to think about them in advance. So, staying near a heating device for a long time leads to the animal overheating. Jumping out into the yard or onto the balcony to cool off, the cat may get sick. The second serious disadvantage is the drying out of the wool. Because of this, pets sometimes begin to shed prematurely, and this is not the only possible problem.
To play it safe, you should consult a veterinarian. If the cat has recently been operated on or suffers from a chronic disease, it is better to place the rookery at a decent distance from the heating structure.
Popular models
The first thing you can use to make a hammock for your indoor cat is an unnecessary dish drainer.
It is suitable for animals of medium and small breeds. This product has a strong base and a suitable shape. The structure is hung on the radiator sections, secured with twine. To ensure that the rods located on the underside do not interfere with the hammock’s bending, they are removed with wire cutters. Sewing a cover begins by measuring the length and width of the walls and bottom of the dryer , then multiplying the resulting number by 2. Cut out the fabric from the fabric, not forgetting to leave seam allowances. Three sides are sewn together, but the fourth is not touched yet. A piece is cut out of padding polyester of such a size that it fits inside when folded. How many layers there will be depends on the thickness of the insulation. Then it is folded to the desired state, stitched in different directions and placed inside the cover.
A zipper is carefully sewn into the fourth side of the fabric. Strings or loops with buttons are sewn into the corners. They are needed so that the case does not wrinkle or bunch up. Now you can put the product on the dryer, secure everything to the radiator and put the cat there.
The hammock, which will be mounted not on the side, but on top of the heating device, is made from boards. It will be appreciated by pets who prefer moderate heat. You need to take 4 strong wide boards and put together 2 stands in the shape of the letter G from them. Spacers are placed on both stands near the junction of the boards.
The next point requires attention. The L-shaped structures are connected to each other with a bar of such length that it is enough to comfortably accommodate the cat. The long edges of the boards are attached to the battery, and the short edges of the cover will be put on. The fabric base is sewn like this:
Features of creation
To create a truly comfortable resting place for your pet, you need to pay attention to the following tips:
- The product should be quite spacious, about twice the size of your rodent.
- It should be made as harmless as possible, pleasant to the touch and have a neutral smell, otherwise your chewer will not appreciate the effort.
- The fabric must be soft; under no circumstances use metal mesh or other objects made of this material.
- Even though a rodent may chew through the fabric, you can then make a new hammock.
- Don't forget about secure fastening.
- If your pet is large, it is advisable to hang it not on ties, but on hooks or carabiners. They can be purchased at specialized hardware stores.
NOTE. Hammocks, just like hutches, and all other accessories in your pet's cage must be kept clean. This allows you to prevent the occurrence of various dangerous unpleasant diseases, and will also relieve you of the unpleasant odor.
Choosing material
If you don't like or don't know how to sew, you should choose simpler hammock models. So, how can you make a simple hammock for a large rodent? For this you can use:
- Old bedding that will require folding twice or more.
- Your old unnecessary hat.
- Unnecessary scarves.
- Your unwanted socks can also make a great hammock for your rat.
- Out-of-fashion old woolen hats are sure to please your rodent.
These items can simply be secured in the corner of the cage at a suitable height; keep in mind that the animal must freely climb into this resting place and climb out of it in the same way.
Step-by-step instruction
- To sew a hammock for a rat, you need to prepare fleece fabric measuring approximately 30 by 60 cm; this will be the base.
- Fold the short sides of the rectangular fabric 1 cm and sew or topstitch. Already expired edges must be joined in the center. Please note that the right side of the fabric should be on the inside.
- Sew the long sides along the edges. Turn the product you received inside out and the front side will be in front of you.
- Place a grommet in one of the corners and mark the location for the future hole.
- Use small scissors to make a hole, but be careful not to make it too big. Using a hammer and a punch, secure the grommet.
- Attach curtain hooks and secure the item in the cage. This must be done in such a way that it is convenient for animals to climb into and out of your hammock.
REFERENCE. In order for your pets to quickly get used to the new item that will appear in their house, you need to put there a piece of fabric or bedding that was previously in their house and has smells familiar to them. This will allow the rats to always be in comfortable conditions.
As a result of such simple manipulations, you can make a very comfortable hammock for your rat, which is shown in the photo.
Subscribe to our Social networks
Useful tips
Once you've built a hammock, don't relax. You will have to go all the way and provide care for him, since the chinchilla herself cannot do this. And such a hammock will last much longer.
- Washing the hammock should not be done less than once every 50–60 days (the fluffiness of the chinchilla is well known, and accordingly, it sheds).
- In addition to wool, the material of the hammock is covered with a layer of food (the chinchilla does not learn to eat from a tray and often drags food into the hammock).
- Washing with odorous substances is not advisable (a chinchilla may ignore its favorite place due to the pungent odor); ordinary laundry soap will do.
- If the hammock is absent for some time, the chinchilla will be at a loss, so it is advisable to make a pair of hammocks for the washing/drying period. This will not only ensure that the chinchilla will rest, but also that the hammocks will not be too worn out and will last a longer time.
Each edge of the chinchilla hammock must be carefully processed:
- for the reason that she is a rodent (do not forget that it is vital for them to grind down their teeth, without this they can simply die), accordingly, they are active in the “chew and gnaw” subject, and the beloved chinchilla will completely disassemble any fabric into threads, yes and eat it up;
- With her rapid movements in the game, she will probably catch her claws on a separate thread.
When rubbed, they will become electrified and hit the chinchilla (don’t forget that the pet’s fur is thin) with light, but quite sensitive electrical discharges. This will not have a positive effect on her temperament.
Thin fabric will not withstand the pressure of your pet’s claws (the chinchilla does not sit still for a second when it is awake) and will not last very long.
Static toys
These entertainments can also be classified as home entertainment, because they are more likely not toys, but furniture in your pet’s house. However, they allow the animal to maintain adequate activity.
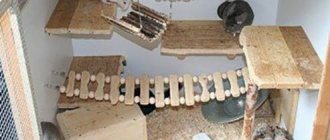
Shelves
Shelves are a universal exercise machine for rodents with weak front legs and powerful hind legs. They allow the animal to jump, quickly changing position. The optimal height for the shelf is 80 centimeters. The animal will easily jump on you and will not be harmed if it falls. In addition, with the help of the shelf, the rodent sharpens its teeth well.
You can prepare the shelf yourself:
- choose a small wooden board of any size (for example, 40x20 centimeters);
- rinse the product thoroughly and pour boiling water over it to get rid of parasites;
- Allow the product to dry completely;
- smooth the board so that there are no chips, sharp edges, or roughness;
- set the desired level.
Place ledges around the cage at different levels to encourage the animal to jump back and forth.
Tunnels
Fluffy ones love to hide in pipes of different diameters, making their way through them and running after each other. The tunnels can be of any size, but at least 30-40 centimeters in diameter, so that the animal does not get stuck inside.
Animal in the tunnel
Tunnels are mainly made of plastic and wood, and the second option must have an iron edge so that the chinchilla cannot chew the edges. Some manufacturers offer a whole network of plastic tunnels that can be disassembled and reassembled to give the desired shape.
It is recommended to use translucent plastic as a material - the pet will feel safe in it. You can always find a rodent that has just fallen asleep inside the simulator without fear of getting stuck there.
Sticks and ladders
An ordinary wooden stick placed in a cage causes no less joy in the queue; it can be rolled, chewed and climbed (if placed between the floor and a shelf). The ladder is a modernized version of the cane that performs similar functions.
Stairs in the house
Rodents sometimes use it as a back scratching tool - just place it vertically against the wall of the cage.
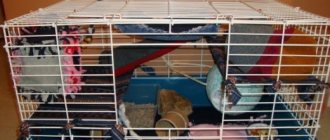
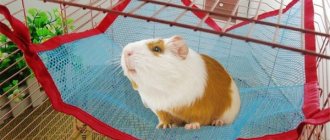
Hammocks
By installing this device inside the cage, you will see how much your chinchilla will like it. In this mini-bed you can not only relax, but also swing from side to side, like on a swing.
Chinchilla in a hammock
Most commonly used materials:
- wood;
- thick fabric;
- flexible but durable plastic.
In addition, hammocks can be single-tiered or double-tiered (tubular). The second option gives you more options. In case of danger and in the cold season, the animal hides inside. In summer the animal rests upstairs.
Useful tips
Once you've built a hammock, don't relax. You will have to go all the way and provide care for him, since the chinchilla herself cannot do this. And such a hammock will last much longer.
Each edge of the chinchilla hammock must be carefully processed:
When rubbed, they will become electrified and hit the chinchilla (don’t forget that the pet’s fur is thin) with light, but quite sensitive electrical discharges. This will not have a positive effect on her temperament.
Thin fabric will not withstand the pressure of your pet’s claws (the chinchilla does not sit still for a second when it is awake) and will not last very long.
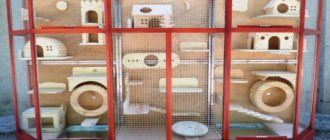
Construction
We start after purchasing materials.
If you are making a cage at home, then equip and prepare the place in advance. A sufficient amount of light is necessary, as the work will take a lot of time. You can watch different videos on how to make a cage for chinchillas to have an accurate idea of the work ahead.
We cut out a rectangle from this material to size - this is the future base of the cell. It must be covered with clapboard or a plywood sheet on top.
Check it out here too!
- Do-it-yourself trolley - how and from what to build a decorative and tool trolley (135 photos and videos)
- DIY nests for laying hens: drawings, tricks, best solutions and tips on how to make nests correctly (115 photos and videos)
- How to hem felt boots with your own hands: materials, tools, useful tips for hemming. Step-by-step instructions with photos + master class with video!
We install a removable tray on the base. If you decided in advance that it will not be there, you need to treat the material with water-repellent substances. Because chinchillas will go to the toilet and water may spill from the drinking bowl.
We vertically fasten the bars with self-tapping screws, ties or nails to the base in the corners. This way we will create the frame of our cell.
The top of the frame is done in exactly the same way. You can install an additional horizontal belt. This will strengthen the structure and help create additional shelves.
Metal rods or mesh are stretched over the frame. We fix it with nails or screws to the base. Make sure that there are no sharp protrusions sticking out anywhere that could injure the animal. To do this, you can install a metal strip.
If the building has several floors, it becomes necessary to place stairs between floors. It will be much more fun and interesting for the animal to live in a house equipped with various loopholes and labyrinths.
Use your imagination when creating these things, but don't make them too small. Otherwise, you will have to destroy your product while rescuing the stuck animal.
Chinchillas are very sensitive rodents and even a small draft can provoke illness. To prevent this from happening, we cover two adjacent walls with wood. It is better to place the cage approximately 50 cm from the floor.
You can make a convenient shelf or frame. It may contain toys and care products. Do not install it near furniture or interior items. The animal can spoil them
We buy treatment products from construction or pet stores. You need to coat the inside with the solution to ensure that your chinchilla has an antibacterial living environment.
The outer part of the structure is varnished or painted. These are important measures to protect metal from corrosion and wood from rotting.
After reading our article, you can understand that it is not at all difficult to build a cage for a chinchilla with your own hands.
TOOLS
- Drill
- Sewing machine
- Centimeter
Step 1
Iron the jeans and distribute according to the pattern: 1 and 4, 2 and 5, 3 and 6. If possible, so that models of the same color are not next to each other
Step 2
Choose the shortest jeans and trim the hem off both legs. Then also trim the hem of their “pair”.
Step 4
Measure the length of the piece obtained from two pairs of jeans. You need to measure from the waist of some to the waist of others, along the outer edge. Cut the rest of the jeans based on the length of the part. Sew all pairs.
Step 5
Cover the holes between the legs of each part with inserts. To do this, you need to cut out 6 “patches” (see picture) from additional fabric and sew them on the top and bottom sides of the jeans.
Step 6
Sew the sides of the jeans on the arms end to end. Do not overlap the trouser legs, otherwise later, when working with the braid, the sewing machine will not “take” them.
Step 7
Remove the back pockets from your jeans. If the jeans are a classic model, you will get 6 pockets on each side of the hammock. Duplicate each pocket with a piece from a different fabric.
Step 8
Sew the pocket pieces in pairs, inserting pieces of braid (10 cm each) on top. Then secure the ends of the braid to the sides of the hammock.
Step 9
Make 2 “fastening rings” from the “binder” cut off in the second step. To do this, fold the piece in half in a figure eight shape and cover it with fabric.
Step 10
Sew the braid to the hammock, along the side seams of the jeans. Thus, the central part of the braid will be at the junction between the jeans. Sew the braid with two seams (First one edge, then the other. Start from the middle of the seam on the bottom side of the hammock. Sew to the waistband of the jeans, pass the braid through the “attachment ring”, leave 1 meter of braid unsewn. Next, continue sewing the braid to the seam on the top side of the hammock , pass the braid through the second “fastening ring”, also step back 1 meter, sew to the seam on the bottom side of the hammock, when you reach the middle, cut off the braid (same way for the second seam on the braid).
Step 11
Sew the braid to the side edges of the hammock. Proceed according to the algorithm (Attach the end of the braid to the underside of the jeans waistband, then pass the braid through the “attachment ring” located on this side, step back to the appropriate length of the braid (this section will already be more than a meter. The length of the free section of the braid can be determined by eye: for this straighten the hammock, pull out the “fastening ring”, thread the sewn braid into it and measure it). Sew the braid to the edge on the top side of the hammock, closing the sewn ends of the braid from the pockets in the process. Step back the same length of braid as on the opposite side, cut , sew the remaining tail to the hammock, make a second seam on the braid. Also sew the braid to the second side of the hammock. Additionally, sew the braid to the middle of each belt, threading the braid through the “attachment rings” and backing off, as in the previous steps). Sew several seams across the ribbon loop at the very edge of the hammock. Then step back 5 cm towards the “attachment ring” and stitch a few more times - back and forth. You will get loops for the handle.
A hammock is an excellent “remedy” for fatigue and stress relief after a working day. Just a few hours spent in it will help you have a good rest, sleep and gain strength. Nowadays, stores offer a huge variety of types of hammocks, but it’s much more pleasant to make one. The easiest option is to sew it from fabric, and you don’t even have to buy it; you can use old things that have been lying idle for a long time.
When selecting materials for sewing a hammock, it is recommended to opt for natural and durable fabrics.
Ideal for: mattress teak, canvas, tarpaulin.
The fabric you choose should be strong enough
. If the hammock is placed on a roofed terrace, then there are no further requirements. If the hammock will be located under a tree in the garden, then the fabric must also be waterproof.
What is it needed for
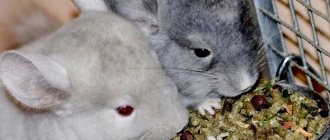
Of course, at first glance, a chinchilla is a soft, fluffy, lazy and not very active creature (while sleeping). But as soon as she is given freedom, she will become extremely mobile, active, jumping and running across living creatures, even if she is inside the enclosure.
On the other hand, this rodent also loves to relax very, very much, therefore, it is necessary to make every effort to arrange a comfortable and spacious home.
There should be enough space to both play and relax.
The chinchilla loves toys, and they should be different (a ball, a pendant and a spinning wheel), but the pet also loves to relax no less, so it is necessary to provide passive rest, for example, in a hammock. In such a shelter, a rodent can lie and bask for hours, and sometimes even swing, like on a swing.
Strange? Strange. But only at first glance.
Zoologists have discovered an unexpected fact - it turns out that many pets really like mini-hammocks. The steady swinging of the hammock provides a peaceful state of sleep, both for animals and for people. And chinchillas also seek protection in a suspended shelter - since it is more difficult for predators to reach it. You can bring a lot of insulating material into such a shelter and not be afraid that a relative will steal it, as if it were on the surface of the earth, and besides, the shelter will not flood if it suddenly rains. All these reasons can prompt the owner to arrange a hammock in a chinchilla’s cage.
Degu Breeding
Chilean Degu squirrels breed twice a year. Pregnancy of females lasts 3 months, the litter can consist of from three to thirteen squirrels. Babies are born with open eyes and black fur. During the first 30 days they feed on mother's milk. The male takes an active part in raising the young: for a month he warms the baby squirrels and “looks after” them while the female is away.
It is worth noting that immediately after giving birth, Degu squirrels go into estrus. During this period, most often, males re-fertilize their companion.
( 1 rating, average 5 out of 5 )
Do it yourself
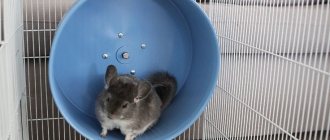
If all the wheel options available in stores are not suitable, and making a custom-made exercise machine is expensive, you can try making a running wheel for chinchillas with your own hands. At the same time, you have the opportunity to choose the material and size based on your own preferences. This will save money and make your pet happy.
How do chinchillas sleep?
Wooden
To make a wooden exercise machine you will need:
- plywood sheet about 1 cm thick;
- jigsaw;
- drill;
- bearing;
- self-tapping screws;
- screws;
- bolts;
- small boards measuring 3x15 cm.
Manufacturing process.
To get a perfectly even circle, you need to cut a hole in the middle of the plywood with a jigsaw . From the center we begin to measure the desired diameter of the future wheel. Having drawn a circle on the plywood, you need to cut it out along the contour with a jigsaw.
After the circle is ready, you need to make a ring with the same diameter. The planks are attached inside the resulting ring using small self-tapping screws. Before doing this, you need to drill holes in them with a diameter of about 1.5 mm to protect them from cracking. We attach the ring to the outside of the plywood circle. This will give the structure strength.
To attach the wheel you will need a fifteen centimeter bolt. You need to put a steel washer on it, the diameter of which should be slightly larger than the diameter of the bolt. It is installed so that it is inside the structure. It is secured from the outside using a washer. A bearing is put on the bolt and secured to the bar with self-tapping screws.
How to make a drinking bowl for a baby with your own hands.
There are two ways to install a wheel in a chinchilla cage:
- The simulator is attached with self-tapping screws to a wide wooden board and placed in a cage. To prevent the animal from turning over the structure, the width of the board must be at least 15 cm .
- The bar on which the bearing is located is screwed to the wall of the chinchilla house using wire or a strong cord. This method of fastening is considered the safest, as it will not allow the animal to knock over the wheel.
From the pan
Making a running wheel for a chinchilla from an aluminum pan is a less labor-intensive process. To do this, you need kitchen utensils of the desired diameter. Since the height of the pan is greater than needed for the simulator, you will have to saw off the excess, leaving about 13-16 cm. After filing , the edges need to be sanded to remove hangnails and protect the pet from possible injuries. After this, the wheel is attached to the tensioner pulley. Your pet's toy is ready to use.