Homemade hamster cage
If you have never taken on this type of work before, be prepared for the unexpected. The result does not always correspond to the original plan. If you know how to saw, cut and grind, the task will not be impossible for you.
So, to make a cage yourself, you will need the following tools:
- metal mesh with small cells;
- pliers with narrow ends;
- side cutters;
- double-sided file;
- aluminum wire with a diameter of 2 mm;
- hard wire 2 mm thick for making hook-locks;
- enamel or paint for metal and white spirit;
- paint brush;
- a piece of plywood 4 mm thick and fasteners for it;
- PVC sheet and glue for it.
PVC or plywood is provided for the cage pallet. You need to take just one thing.
A wooden cage is more environmentally friendly, but is more difficult to assemble. The PVC pallet needs to dry for a long time after gluing, since the glue is toxic to animals. This will take a week.
Among the tools, include a jigsaw for sawing the pallet material.
Step-by-step instruction
Before you start working, decide on the size of the cage. Hamsters need low structures with a wide base to accommodate all the accessories. Consider the size of the animal: for large animals the room should be higher.
You need to start with the cage frame. Draw a drawing of the side walls and top. Think about where the doors, bedroom feeder, and toilet will be placed. How convenient will it be for you to clean the cage? If in the future you want to complicate the design by attaching an additional link to it, take this into account. Provide a hole where the transition tunnel can be inserted. So, let's begin:
- Based on your drawing, calculate the amount of mesh of other materials. Buy a mesh with a margin of about 0.5 meters.
- Spread the net on the floor, securing one end with a weight.
- Cut out all the structural details from it: walls and ceiling. It's easier to cut along the cage itself.
- Cut off any protruding tails with side cutters.
- Cut out all the windows and doors in the blanks that you have provided.
- Cut off the patches from the remaining part of the mesh. Those pieces that will cover windows and doors.
- Run your finger along the edges of all the pieces. File any sharp edges.
- Paint the grille after cleaning it with white spirit.
- Connect the frame parts with aluminum wire.
- Use stiff wire to make clamps for the door. You will have to bend it with pliers.
- Measure the required parameters on the sheet and saw off according to the markings.
- Make the sides. Place 4 strips of the same width on the remaining piece of sheet.
- 2 sides need to be glued to the side parts, 2 - to the front and back. They must match the length and width of the plate itself. Some have a length of 42 cm, others 52 cm. The height of all sides is about 10 cm. For strength, we attach the sides directly to the plate, and not to the side.
- On the inside of the box you need to glue plastic slats of about 1 cm. They will cover the junction of the plate and the side. The length of the slats can be measured along the inside of the box. They will be slightly shorter than the sides of the plate.
- If the cage turns out to be heavy, make stiffening ribs on the bottom on the outside so that the PVC does not bend. To do this, cut three 1.5 cm wide strips from the remnants of the sheet along the length of the plate. Glue them to the bottom from the outside.
- To prevent the sides from coming apart, glue the plates onto them end-to-end over the entire height of the pallet. The width of the plate is 6-8 cm. For 4 corners you will need 8 plates 8x10 cm.
- If the cage will stand on the floor, give it legs. Each leg will consist of 4 pieces of plastic glued together in a “stack”. The size of the pieces is 5x5 cm. In total, cut out 16 such plates.
We have finished making the mesh frame. We need to move on to the pallet.
Cage tray
The pallet must be assembled after the frame is ready. To properly assemble a hamster cage, you need to take into account in the pallet parameters a margin for the thickness of the material (4 mm) + 1 cm. If you have a rectangle of 40x50 cm, the size of the pallet sheet should be approximately 42x52 cm. Consider a PVC pallet. The wooden one is made in the same way, but with a different fastening. You have measured the perimeter of the cage, bought a 100x100 cm PVC sheet, let's start making:
Please note that when working with PVC glue, you need to dry the pallet for a long time. Toxic substances will disappear in about a week. This is a general diagram of the pallet assembly. You can change, add or remove something in it. The mesh frame must be installed in the pallet. The cage is ready.
Tips and tricks
In addition to the basic rules for building a hamster cage, there are additional recommendations that are no less important:
- The materials used must first be thoroughly washed, disinfected and cleaned of excess - stickers, paint residues.
- Before starting work, you need to think about the structure of the cage: plan the toilet, feeding areas, a free part for games and physical training, as well as a place for the hamster to sleep and rest. All basic things should fit inside, and large structures such as labyrinths can be brought outside.
- All parts must be firmly secured. It is better not to use small fragments or place them on the outside of the home - in a place inaccessible to the hamster.
- The cage must be made in such a way that its design does not interfere with regular cleaning. You can make it partially removable, which is especially important for multi-level houses.
- A lightweight house made of plastic or bottles can be used as a carrier.
- For large and heavy housing, it is worth making additional reinforcements between the main part and the pallet. Under heavy weight, the sides of the bottom may become deformed, causing the cage to fall.
- Locks must close doors securely.
- When constructing the cage, it is allowed to use glue, but all parts must dry before moving the pet. It takes about a week for complete drying.
- Hamster cages should be placed on a flat, stable surface, such as a low table. The house can be placed in the corner of the room or on an insulated balcony.
- When making a house, you can use a ready-made frame - an unnecessary cabinet or cabinet.
Making a hamster cage with your own hands will require some effort and construction skills. Such a house will not only be cheaper than a purchased one, but will also meet the technical requirements and personal ideas of the owners about an ideal home for pet rodents.
How to make a hamster cage with your own hands from a box
When it comes to a box, don’t immediately think of a cardboard box. The animals have sharp teeth. Cardboard and paper will be eaten very quickly. Large plastic containers seem designed to be used after minor modifications for animals. A small container is perfect for a dwarf hamster, a larger box is perfect for a Syrian hamster.
Rectangular containers have one drawback - they do not allow air to pass through. By replacing part of the lid and side walls with a fine grille, you can provide your pets with spacious housing. Pay attention to the lattice processing method described above. It is unacceptable for the hamster to cut itself on the sharp edges of the grill.
You can cut through the plastic with scissors or a sharp knife. Attach the grille using screws with a nut or self-tapping screws. It is better to pre-drill holes for self-tapping screws or pierce them with a heated awl. Some people use a soldering iron for this. Screws or self-tapping screws must be inserted from the inside so that the sharp ends stick out and do not injure the animals.
How to make a second floor in a hamster cage
The second floor of the cage may be needed to accommodate another animal. Hamsters rarely like the proximity of their relatives. In this case, two boxes are simply placed on top of each other. At the same time, you need to add ventilated space at the bottom (replace another wall with a grille).
If the second floor is needed for one pet, you can solve the problem in the same way. Place the second box on the first one, but connect the two boxes with a tunnel. Hamsters love different transitions. Your animal will run from one box to another. By doing this you will expand its “habitat” and be able to place more different equipment. You can make plastic tunnels and labyrinths yourself from bottles or purchase ready-made ones at a pet store.
To make your own tunnel, cut the bottom and neck of a plastic bottle so that both ends have the same diameter. Wrap duct tape around the edges along each cut line. Insert one bottle into the other and secure with electrical tape. Make sure the mount is strong enough. Select the size of the dishes according to the size of the animal. A large animal needs a container of 2 liters, a Djungarian hamster needs 1.5 liters.
There are craftsmen who use white corrugated and gray plastic pipes for tunnels, which are used when installing a washbasin in the kitchen.
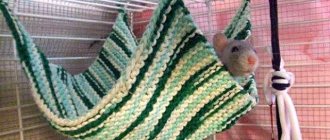
Why does a ferret need a hammock?
Beginning ferret breeders are often surprised to learn that their pet needs a hammock, and not an ordinary bed, for a comfortable existence and sweet sleep.
Animals can sleep in boxes, on pillows, in their house, and even crawling into a warm sock or felt boot, but only a hammock allows a ferret to feel completely safe. This is due to the fact that wild relatives of domesticated ferrets always choose secluded dark places to sleep - under a stump, in dense bushes, or dig holes. Soft earth or grass perfectly takes the shape of the animal’s body, and it feels protected both from enemies and from bad weather.
Domestic ferrets living in an apartment do not have the opportunity to dig a hole for themselves, and the presence of a sleeping place, the same as dry leaves or grass, makes the pet happy - he sleeps well, so he plays and “hunts” with great pleasure.
Hamster cage made from plastic bottles
Temporary housing for animals can be made from six-liter plastic bottles. You need to take 3 bottles of the specified volume. Cut off the top part “shoulder-wise”. Remove part of the “collar” from the cut part. What remains is a small funnel with threads and a lid. If the edges of the funnel are sharp, apply electrical tape to them. The “ceiling part” must be cut off from the lid so that the washer remains on the thread.
The bottles should be placed vertically in one row or in a triangle. These will be your hamster's 3 rooms. Cut holes a short distance from the bottom. The size of the holes must correspond to the diameter of the neck. The holes are transitions from one bottle to another, so make them at the same level in adjacent links. The bottle necks will serve as mini-tunnels. Connecting the bottles:
Now you have a mini-tunnel, which you secure with a washer. Three interconnected rooms need to be filled with hay, sawdust, a shelter, a feeder and a drinking bowl must be installed. To repair a cage made of such material, it is enough to replace one link with another. This room can be expanded by adding any number of rooms.
Vintage basket
Here we are dealing with a representative design in the style of modern rural fashion. Best suited for lovers of cycling or short distance travel on scooters. The basket itself is woven from flexible willow and equipped with an openwork wire lid, which prevents the cat from wanting to get out while moving. At the first glance at such a carrier, one is reminded of idyllic pictures from centuries ago, when food from the market was transported in a similar way on bicycles. The entire structure is conveniently attached to the steering wheel using leather straps and does not require much time for preparation.
The advantage of the option under consideration is, of course, its original design and originality. The downside is limited functionality. Although, if desired, the basket can be used for its intended purpose.
Price – 1,128 – 1,708 rubles.
DIY hamster terrarium
There are some benefits to keeping rodents in an aquarium or terrarium. These containers provide good visibility. Odors do not penetrate through glass. The disadvantages include:
As a rule, animal owners take ready-made glass boxes for their pets and cover them with nets. If the mesh is high enough, the mesh material is not important.
The animal will not reach it with its teeth. It is difficult to provide sufficient ventilation in a homemade terrarium. Preference should be given to low aquariums with sufficient bottom area.
Glass is a cold material. The bottom of the terrarium should be covered with a large layer of sawdust or additional surface covering should be provided. You can build a cage from plexiglass. It is lighter in weight and warmer, but is prone to scratches and looks dull.
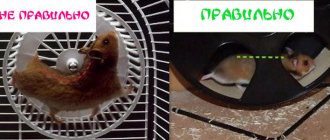
Why do you need a trainer?
Hamsters, by nature, are nocturnal rodents. Under natural conditions, animals run long distances in order to feed themselves. Hamsters kept at home are deprived of this opportunity. In addition, there is simply no particular need to independently search for and obtain food, since timely and sufficient feeding of the pet is provided by its owner.
But despite favorable conditions and satiety, hamsters still need to periodically receive physical activity. This is necessary not only to entertain the animal, but also to maintain the health of its cardiovascular system. Regular physical activity stimulates the rodent's metabolism and metabolism, helping to keep the muscular system in good shape.
And in a small cage, you need to give the hamster the opportunity to move, because it is not safe to let him roam freely. Due to its small size, the animal is not very visible and can be accidentally injured. But other pets can also be dangerous for hamsters: cats, dogs, large parrots.
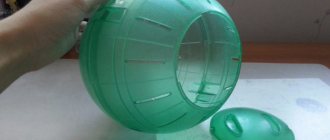
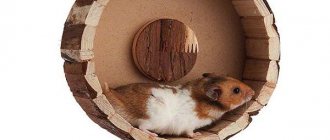
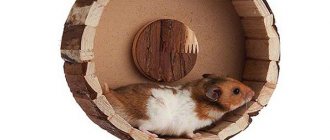
A convenient and safe solution to this problem is to install a running wheel directly in your pet’s home. Hamsters quickly understand how to use it, and if they want, they can climb onto the simulator and run around at any time.
The only drawback is that the hamster is a nocturnal animal. That is, its activity in most cases occurs at the time of day when we are used to sleeping. Therefore, active night runs can disturb apartment dwellers if the wheel squeaks or makes a knocking sound.
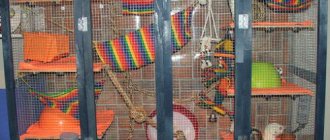
Interesting examples
We present to your attention some interesting examples of how you can arrange a house for a hamster. You can repeat this yourself using scrap materials and using the above tips:
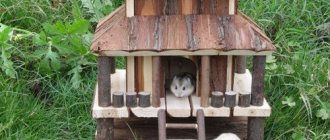
- a homemade two-story wooden house for a large family of small animals;
- using an aquarium;
- a dwelling made from an ordinary plastic container;
- interesting option made of wood and glass;
- another original way to set up a cage for a hamster from a regular aquarium;
- the easiest way to make a hamster house from an ordinary cardboard box with minimal cost and effort;
- a home for a small animal from an ordinary parrot cage.