What can you do for your hamster?
You can make a lot of interesting toys for your hamster, for example:
From a washcloth
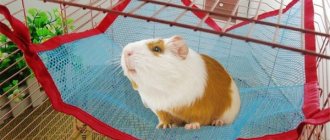
The easiest way is to make a hammock from a cloth washcloth, which is a mesh of woven cords. It is simply pulled onto a metal or plastic case that fits in size. In the role of the latter, you can use various small parts or ordinary thick wire, bending it to obtain a frame of the desired shape.
Knitted
To tie a hammock, you need to prepare:
- yarn;
- hook No. 1.5-2 for thin yarn or No. 4-5 for thick yarn;
- scissors.
The knitting pattern can be as simple as chain stitches (first row) and single crochets. In this way, a rectangle with a minimum size of 15 by 20 cm is knitted.
Advice. Use a tight knit for the hammock, otherwise the rat will cling to the holes with its claws or fall into them.
In addition to the resulting quadrangle, you need to make four long ties. They can consist of 2-3 rows wide. The product is attached to the top of the cage.
A yarn hammock can stretch over time. To make it last longer, make a double bottom: tie two identical rectangles and connect them around the perimeter.
Operating rules
Now you know how to make a hammock for a nimble animal, but you need to know how to use it correctly. Failure to follow safety precautions may result in injury to your hamster.
So, here are the recommendations for using a hanging bed:
- It is better to place the hamster hammock on the second tier of the cage.
- It should not be hung too high above the surface of the second floor, so that the animal does not suddenly hurt itself.
- At first, watch the animal to see if it is gnawing on a new piece of furniture. If the home does not try to test the furniture, then you can leave the hammock overnight.
- Fluffy can bring food into the bed and litter. He is also capable of “playing whale” right in the hammock. Therefore, you will have to wash it periodically with soap.
Our tips will help ensure your hamster's safety and comfort.
Thus, making a comfortable hanging bed for your pet is not difficult at all. The main thing is to have the desire and a little free time. You can also get creative and attach ladders to the hammock or decorate it in some way.
Hamster owners are always trying to make their pets' lives more comfortable and fun. There are special toys for them, leashes for walking and labyrinths. There is also a hammock for a hamster. It is also important that you can make such an accessory yourself.
- Why does a hamster need a hammock?
- What can you make a hanging bed from?
- Manufacturing Features
- Recommendations for pet owners
- Conclusion
Making a hammock for a hamster with your own hands
Chinchilla and hammock
Although chinchillas look like soft, fluffy, lazy and sedentary rodents, this is actually not true.
These animals are very mobile and active, even in a cage, and therefore it is very important for them to arrange the most comfortable and spacious home so that there is enough space for frequent games and many toys. A mini hammock is a favorite sleeping place for all pets. And this is not just like that. According to research, a hanging bed is the most comfortable place for the highest quality and most peaceful sleep for both animals and people. So our little brothers fell in love with such a device for a reason, which means you can safely replace your bed with a hammock.
Does a hamster need a hammock?
Some hamster owners believe that their pet can do just fine without a hammock, so they consider such a product absolutely useless. But a hanging cradle is not just a piece of fabric attached to the ceiling of the cage.
Did you know? Hamsters do not distinguish colors and are able to see clearly only those objects that are in close proximity to them.
A rodent needs such an accessory for several reasons:
- the opportunity to swing in a cradle - the animal is constantly active and loves to play, so it will certainly be delighted with such an impromptu attraction;
- a cozy place to sleep - hamsters love to relax in a secluded corner, hidden from human eyes;
- the ability to leave the pet in the cage while cleaning - in this case, it is enough to put the animal in a hammock to replace the bedding and wash the bottom of the rodent’s home;
- The hamster loves to climb and can climb into the cradle using special side ladders.
What can you make a hanging bed from?
When deciding to build a hanging bed for your rodent, it is important to reconsider the advantages and disadvantages of all possible design options for such a device. The first thing that is important is reliability. Therefore, the materials must be durable and of high quality. The simplest options for a hanging bed will be:
- Accessory made of fabric. It will require a couple of small squares of the fabric itself, a synthetic padding lining, metal carabiners, braid and sewing supplies (needle and thread, scissors, etc.).
- A device made from a washcloth. The simplest and most economical option. To make it, you only need a washcloth and thick wire.
- Accessory made of yarn. Suitable for those who know how to knit and crochet.
It is not advisable to consider a bed made of yarn. This option is short-lived and is more suitable for calm rodents. The yarn is quickly frayed or chewed by the animal itself.
Manufacturing Features
Choosing a material for a hammock
Before you start making new furniture for your furry pet, it is important to consider some features. In part, they are related to the implementation of plans and the prevention of possible errors. The finished bed should be comfortable for the hamster, so you shouldn’t skimp on the size of the canvas. And for the practical side of the device, it is advisable to use durable metal carabiners.
All these are the nuances of working on a fabric hammock. A device made from a washcloth will cause less hassle and will be done in a shorter period of time. The main thing is to use a cloth washcloth that is not worn out and find a suitable body on which to stretch it.
From fabric
A hanging bed made of fabric will last several times longer than its counterpart made of a washcloth. It takes a long time to do, especially if the household does not have a sewing machine. It's done like this:
- 2 squares are cut out of the fabric, which will be the two sides of the hanging bed.
- A padding polyester lining of the same dimensions is cut out.
- The braid is cut into 3 strips of 30 cm each.
- The ribbons are applied to the edges of the product (a synthetic pad is placed between two squares of fabric) and stitched so as to hide the place of the cuts.
- Carabiners are inserted into the braid, adjusted to size and stitched.
After removing the protruding unnecessary threads, the device can be installed in a rodent cage. He will definitely like this vacation spot.
From a washcloth
This accessory is made many times faster. The main thing is to get a reliable body to which the fabric will be attached. It can even be a wire. Having given it the required shape, you should pull the washcloth over the body, securely tying its ends to it.
All that remains is to hang the bed in a pre-selected place. The pet will be happy with such a resting place and will immediately show interest in the accessory.
Making a hammock yourself
Before you get started, you need to think through each stage of the work. For this:
- draw what you want to get in the end;
- think over the design of the future hammock;
- select durable materials and tools;
- bring your plans to life.
To make the bed for your furry friend safe and last a long time, pay special attention to the selection of materials. Hammocks are different, so the “raw materials” for them are different.
You can use the following materials:
- Durable yarn.
- An old washcloth.
- Special fabrics.
- Plastic parts.
- Metal carbines.
The choice of tool for creating it depends on the type of crib. This can be a sewing machine or a regular needle, knitting needles or a hook.
We offer you several types of hammocks to choose from.
From yarn
There is nothing easier than making a hanging crib for your furry pet from yarn. Of course, if you know how to knit or crochet. The yarn should be strong, it is better to take wool mixture or acrylic. Select the knitting needles and hook in such a way that no large holes remain when knitting.
If you are using a crochet hook, crochet a rectangle or square with a single crochet. In the case of knitting needles, you can knit using garter stitch or stockinette stitch. Simply tie a square or rectangular piece of fabric and attach it to the bars of the cage. The hammock is ready, you can put your hamster in it!
The downside of a knitted bed is its fragility. After all, fluffies love to try everything with their teeth: it’s enough to gnaw through one loop and the fabric will unravel. Therefore, keep an eye on your pet while he is resting and do not let him chew the furniture!
From a washcloth
Probably many people have old cloth washcloths at home. They are woven laces knitted into a mesh. You can use this washcloth under your hamster's bed. But first you have to find the body.
It is better to use metal or plastic parts as the body. If you don't have anything suitable at hand, use thick wire. Rectangular parts are suitable, but the ideal shape is an oval.
All you need to do is stretch a piece of old washcloth over the body, secure it and hang the crib in the cage! On such a cozy bed you can first have a snack and then relax. Like in the old Soviet cartoon: after eating, you can sleep!
From fabric
The most difficult option to implement, but, as practice has shown, such hammocks last much longer. Now you will learn how to make a fabric hammock for a hamster.
Basic requirements for the material:
- the fabric must be strong and dense, not capable of forming “arrows”;
- It is better to choose a soft lining.
To implement the idea you will need a sewing machine. In the absence of one, you can sew with a needle, but machine stitches still look neater, and the process goes tens of times faster. You will also need scissors, thick braid, pins, blue lining (or other soft material) and small metal snap hooks. The width of the ribbon must be at least 2 cm.
Here are step-by-step instructions for creating a hammock:
- Cut out 2 squares of fabric with a side of 15 cm. These parts are the top and bottom sides of the future crib. Along the sides of the square, cut some fabric in an arc to give the product an interesting shape.
- Cut a square of the same size from padding polyester or other soft material. It will give the crib softness.
- Cut the ribbon into 4 identical strips 30 cm long.
- Stack the squares on top of each other so that the soft fabric is hidden inside.
- Secure the squares with pins.
- Then sew ribbons to each side so that the cuts are hidden. You will still have long ends of ribbon, as long as you don't cut them off!
- Thread the ends of the ribbons into the carabiners. Attention! At this stage, fitting is needed! Adjust the length of the ribbons, connect 2 adjacent ends into a loop.
- Sew where the ribbons join and cut off the excess ends.
- Attach a small metal clip to each corner of the square.
- Make fastenings and trim the protruding threads so that they do not interfere and do not spoil the appearance.
So, your comfortable hammock is ready! Invite your hamster to evaluate your efforts!
Attention! Sizes are indicated for miniature dwarfs and Roborovsky hamsters! If you need a hammock for a Syrian hamster, make the side of the square 20 cm.
What is a hammock for?
A hammock is a suspended piece of dense fabric on which a rodent is placed. At first glance, this piece of furniture will seem useless to you, but in fact it can be used in various situations. For example:
- On such a chic attraction, you can quietly rock the homa, which will entertain your furry friend.
- The hammock can also be turned into a resting place where the fluffy will sleep.
- If the cage has a retractable bottom, then during tidying you can transplant the furry miracle into the hammock, rather than removing it from the cage.
- Some store-bought “beds” have additional climbing frames.
Let us remind you that dzhungariki are cheap, from 50 to 150 rubles. But hamster interior items are sometimes a little expensive. For example, for a hanging hammock with a pair of ladders in a store they will ask you for at least 900 rubles!
Whether the entertainment is worth that kind of money is up to you to decide. But it’s much more economical to make a hammock hammock with your own hands. This won't take much time if you have basic sewing skills. But the process of creating a cozy bed for a home can be a lot of fun!
Bed material
Rats, guinea pigs, hamsters are very active animals with fur. Synthetic or silk fabrics can become electrified and cause static shock. To prevent this, choose hammocks made of denim, cotton, or fleece.
These materials are soft and durable - they do not tear, do not stretch and can withstand repeated stress from claws.
Proven, popular manufacturers of products for rodents make hammocks from environmentally friendly, safe fabrics.
Hammocks should not be slippery or fragile. For these reasons, it is better not to use sunbeds made of silk, satin, taffeta, gabardine, or satin.
The fastenings of the beds should not have sharp elements, as this can injure the rodent. Carabiners on chains or regular elastic bands work best.
Using carabiners, you can connect hammocks to each other, lengthening and expanding the space for lying down and playing.
Buy a hammock bed for a rodent inexpensively
The 12 Monkeys online store offers inexpensive and high-quality models of beds from popular pet supply manufacturers. Our prices are the lowest in Moscow. We will quickly deliver the selected product to your home. If you are in another city, we will send it by transport company.
When you make a purchase, you automatically become a member of the “monkey” bonus program, and coupons are assigned to your account. Having accumulated 12 “monkey” coupons, a discount of a decent amount will be activated. See the number of bonuses in the upper right corner after logging into the site under your name. With this discount you can order for free or save a lot. Happy shopping!
Requirements for a rookery
The hammock should be such that it can be easily installed where the cat likes to bask. There should be no clothing or other items near this place from which it is difficult to remove hair. Rodent models are usually placed in cages.
It is worth paying attention to the strength of the frame. Not every foundation will support a Maine Coon or just a heavy cat. A lightweight frame is also suitable for a chinchilla or rat. When attaching it to the battery, you need to take into account that under heavy weight it can come off along with the cat and the hammock. For a heavy animal, the bed is made on the basis of a durable but light frame, for example, aluminum.
It is important how the product will be attached to the battery or other object. It is fixed to an old-style sectional radiator using bent hooks. If the heating element consists of plates, it is better to use special rectangular fasteners for installation. A do-it-yourself hammock for a cat is attached to the battery on the top or side. How exactly depends on the preferences of the pet.
There are cats that like to snuggle almost closely to a warm surface. A lounger hanging on the side and adjacent to a heated radiator is suitable for this type. For purrs who prefer to sit a little away from the heat source, make a hammock raised above the surface by 15-20 cm.
The next point that cannot be ignored is the fabric that serves as the cover. Cats do not like synthetic fabrics, no matter how slippery or fluffy they are. Suitable material with the following characteristics:
- dense;
- lasting;
- abrasion resistant;
- elastic;
- Machine washable.
All these factors must be taken into account both when purchasing and when making a hammock. It is worth thinking about where the product will be located in advance. If there are several heaters in the apartment, you should observe which one the animal prefers.
Advantages and disadvantages
The hammock is simple and easy to use, but the main thing is that you don’t need to accustom your cat to it. She will immediately understand that lying in a warm nest that takes the shape of her body is more comfortable than lying on a hard, flat surface. The undeniable advantage of the compact model is the ability to free up space that was previously occupied by a bed made from scrap materials.
A hammock will come in handy at any time of the year. In winter, the cat will bask in it, and in summer, it will escape the heat next to the cold metal. Owners will be relieved of the need to frequently clean furniture and clothing from adhering wool. If the hammock is temporarily not needed, it can be easily removed and stored .
Such products also have disadvantages, and it is better to think about them in advance. So, staying near a heating device for a long time leads to the animal overheating. Jumping out into the yard or onto the balcony to cool off, the cat may get sick. The second serious disadvantage is the drying out of the wool. Because of this, pets sometimes begin to shed prematurely, and this is not the only possible problem.
To play it safe, you should consult a veterinarian. If the cat has recently been operated on or suffers from a chronic disease, it is better to place the rookery at a decent distance from the heating structure.
Recommendations for pet owners
When making a hanging stock, it is important to pay attention to its reliability and practical location.
This is especially true when choosing a place for new furniture in a cage. Poor placement of an animal's hanging bed can injure it or render it unusable.
There are several recommendations. Owners of animals who made a hammock with their own hands need to:
- Place new furniture on the second tier of the cage. In such a place, the new accessory will be less susceptible to contamination by litter and food particles.
- Hang the accessory at a height convenient for the hamster. This is necessary so that the pet does not get injured when climbing onto the bed.
- Observe the behavior of the animal. If he chews new furniture in the cage, it should be removed.
Periodically, the hanging bed will have to be washed. The made bed quickly becomes contaminated with debris brought in by the pet on its paws.
Popular models
The first thing you can use to make a hammock for your indoor cat is an unnecessary dish drainer. It is suitable for animals of medium and small breeds. This product has a strong base and a suitable shape. The structure is hung on the radiator sections, secured with twine. To ensure that the rods located on the underside do not interfere with the hammock’s bending, they are removed with wire cutters.
Sewing a cover begins by measuring the length and width of the walls and bottom of the dryer , then multiplying the resulting number by 2. Cut out the fabric from the fabric, not forgetting to leave seam allowances. Three sides are sewn together, but the fourth is not touched yet. A piece is cut out of padding polyester of such a size that it fits inside when folded. How many layers there will be depends on the thickness of the insulation. Then it is folded to the desired state, stitched in different directions and placed inside the cover.
A zipper is carefully sewn into the fourth side of the fabric. Strings or loops with buttons are sewn into the corners. They are needed so that the case does not wrinkle or bunch up. Now you can put the product on the dryer, secure everything to the radiator and put the cat there.
The hammock, which will be mounted not on the side, but on top of the heating device, is made from boards. It will be appreciated by pets who prefer moderate heat. You need to take 4 strong wide boards and put together 2 stands in the shape of the letter G from them. Spacers are placed on both stands near the junction of the boards.
Cardboard ball with surprise
You can make a kind of hamster “kinder surprise” from cardboard toilet paper rolls. Essentially, it is a ball with a treat hidden inside. It is well suited as a multifunctional toy for Djungarian hamsters and other tiny breeds. Large animals like the Syrians will deal with the toy faster than necessary. All you need to make this useful homemade product:
- cardboard sleeves;
- scissors;
- treat.
The bushings are cut into identical rings. A standard sleeve makes 5 rings - this is usually what is required for one toy. Two rings are threaded crosswise into one another. A tasty reward is placed inside, then another ring is put on top and another until the cardboard ball becomes tight.
The toy is ready. It will captivate the little restless explorer for a long time. The hamster will “chase” this ball, will definitely try it on its teeth, and so on until it reaches the final goal - it will pull out the treat.
We do it ourselves
Most domestic rodents are big hunters of swinging. Making a swing for a hamster with your own hands is quite simple. These toys for furry creatures are made from the following materials:
- metal;
- plastic;
- tree.
Most often, wood and plastic are used for small rodents, since metal swings are heavier and bulkier. If such a swing is poorly secured, the animal can easily be injured.
A good option would be a swing where the seat is made from a small piece of plastic tube. The hamster willingly runs from one end to the other, or swings the tube and thus rolls around.
We offer you the simplest option on how to make a swing for a hamster at home from the simplest materials that can be found in every home, just at hand.
For the “production” process you will need:
- sticks (counting sticks or ice cream sticks, and medical spatulas are also perfect) both regular and large;
- round wooden stick – 1 piece;
- dense threads or thin but quite dense rope;
- hot melt glue or just any non-toxic glue.
A functional hammock for a hamster from scrap materials: how to make it and where to place it
/ Hamsters / Making a hammock for a hamster with your own hands
Hamster owners are always trying to make the life of their pets more comfortable and fun. There are special toys for them, leashes for walking and labyrinths. There is also a hammock for a hamster. It is also important that you can make such an accessory yourself.
Making a hammock for a hamster with your own hands
Making swings for hamsters
There are a lot of instructions on how to make a swing for a hamster with your own hands. We will look at the 2 most interesting ways.
Rocking scales
To build the attraction you will need thin planks or plywood, bamboo sushi sticks or skewers, and a hollow wooden cylinder. It is best to fasten parts with glue.
To build a “scale,” follow these steps sequentially:
- Plan out 2 equilateral triangles with sides 5 cm long from plywood or planks. You can cut a circle in the center of the triangle, but this is not necessary.
- Scoop out a notch in each corner of the triangle.
- In the cylinder, the diameter of which must be at least 5 cm, drill large holes so that the homa can crawl out through them. Sand all cuts thoroughly.
- Make small holes opposite each other on both sides of the cylinder.
- Saw the skewers so that you get 3 sticks, the length of which is 1 cm greater than the outer diameter of the cylinder.
- Now color the parts the way you like. Get the kids involved!
- Proceed with assembly. Thread one skewer through the small holes in the cylinder. Then attach all the sticks with glue to the notches of the triangle and dry the product.
The result is a very elegant swing that your hamster will enjoy playing with. The indicated dimensions are designed for the Djungarian, and for its Syrian relative, the sides of the triangle and the diameter of the cylinder should be from 7 cm.
How to sew a two-tier hammock for a chinchilla with your own hands
To make a two-tier hammock, you should prepare the following materials:
- Fleece of good quality and density, size 1.5m*0.6m.
- A piece of thin filler 1.5m*0.3cm.
- Edge tape for finishing products.
- Thick thread and needle.
- Fabric scissors.
Let's get to work. Fold the fabric into 2 parts and cut it lengthwise. Then fold the resulting parts in half, but do not cut them. Use all the parts as you need to make 2 floors. The piece of fabric on top should be reduced by 10-13 cm.
- Attach the resulting 2 blanks to the padding polyester and cut to size.
- Now insert the padding polyester into the fabric and sew it with a machine or by hand.
- Use edging tape to trim the edges.
- Mark the fastener locations with a pencil and sew them in.
- You can decorate it at your discretion and imagination.
- Hang the hammock from the roof of the cage.
The hammock for relaxing and playing is ready.
Making a hammock with your own hands
It is easy to find many types of hammocks for rodents on sale. They can be made from a variety of materials, and in most cases are shaped like a rectangle or square. In order to save money, some hamster owners make hanging cradles themselves.
Did you know? The largest hamster is considered to be a representative of the European breed of these rodents. The length of its body can reach 34 cm.
This process is not particularly complicated and consists of the following steps:
- Thinking through the appearance. It is recommended to draw exactly what the finished product should look like.
- Preparing the pattern. To make a cradle of a suitable size, you need to take into account the parameters of the animal. For small rodents, a square hammock with a side of 15 cm is suitable, and representatives of larger breeds need to make a square with a side of at least 20 cm.
- Selection of materials and tools. To create a hammock, you can use fabric, thick and soft yarn, and even an old washcloth. To securely attach the cradle to the cage, metal and plastic rings, chains, and carabiners are used. Depending on the chosen material, the individual parts of the product are connected to each other using a needle and thread, knitting needles or a hook.
How to sew from fabric
A fabric hammock is durable, but making it requires some sewing skills. As the main material, it is allowed to use dense, damage-resistant fabric. To ensure that the cradle has a neat appearance, the seams are made using a sewing machine, but if you don’t have one, you can sew the parts together by hand.
Important! If the hamster begins to actively chew the product, then the hammock is removed from the cage. You can leave it overnight only if the rodent makes no attempt to damage the cradle.
In addition to fabric, to make the product you will need the following materials and tools:
- padding polyester (sheet) for lining;
- braid with a width of 2 cm or more;
- pins;
- ruler;
- pattern;
- a piece of chalk;
- scissors;
- small metal carabiners.
Step-by-step instructions:
- Fold a piece of fabric in half. Using chalk, draw a square on it with sides of 15 cm.
- Attach a pattern to each side of the square and draw an arc along it (the resulting lines should not intersect the vertices of the figure).
- Cut two pieces of fabric, moving along the marked lines.
- Attach one of the resulting parts to a piece of padding polyester and outline it with chalk. Cut another square - it will act as a lining.
- Cut 4 identical pieces of braid approximately 30 cm long.
- Place the pieces on top of each other, placing a padding polyester square between the pieces of fabric. Connect the flaps along the edges with pins.
- Sew pieces of braid to each side to hide the cuts.
- Thread the free ends of the ribbons into the carabiners. Try the hammock on the cage, adjusting the length of the braid as needed.
- Connect two adjacent ends of the braid into a loop. Sew the junction, cut off the excess ends.
- Attach one metal carabiner to each top of the square. Trim off excess threads to give the cradle a neat shape.
From a washcloth
The easiest way is to make a hammock from a cloth washcloth, which is a mesh of woven cords. It is simply pulled onto a metal or plastic case that fits in size. In the role of the latter, you can use various small parts or ordinary thick wire, bending it to obtain a frame of the desired shape.
You will be interested in learning how to make toys for hamsters with your own hands.
After the washcloth is put on the body, its ends are securely tied to the frame. The resulting product is hung from the roof of the cage - for this they use a thick cord, threading it through the holes on the edges of the cradle.
From yarn
If you have knitting skills, you can make a hammock for your pet from thick yarn. The tool used is knitting needles or a crochet hook. This product knits quickly, but is not durable - if an active hamster gnaws a hole in it, the entire fabric will unravel.
The algorithm for creating such a cradle is simple - you need to knit a square with sides from 15 to 20 cm. If a hook is used as a tool, then equal rows of single crochets are knitted. A rectangle is knitted on knitting needles using stockinette stitch or garter stitch. To attach to the cage, you can sew strong pieces of cord to the corners of the resulting fabric or crochet ties using a chain of air loops and single crochets.
Important! To create a knitted hammock for a rodent, it is recommended to take acrylic or woolen thread. The number of hook or knitting needles is selected so that there are no large holes in the resulting fabric.
Hammock for a hamster (photo instructions)
Warning from HAMSTER.RU: to make a hammock, do not use materials that easily unravel into threads and fibers that can wrap around the hamster’s paw, causing serious injury.
If your hamster starts chewing on the hammock, remove the hammock from the cage immediately!
Author: Maria (Marsie)
The sizes indicated in the instructions are selected specifically for a dwarf hamster. For a Syrian hamster, you need to increase the size by 30%.
1. To make a comfortable hammock for a hamster, we will need:
- a piece of fabric (strong, but not loose or too rough),
- a piece of padding polyester or batting,
- trouser or other strong braid 2-3 cm wide.
- 4 carabiners,
- threads,
- sewing machine.
2. Cut out 15x15 cm squares from fabric and batting. From fabric - 2 squares, from batting - 1. Cut the braid into 4 pieces of 30 cm each.
3. We pin the squares together so that the padding polyester ends up between two fabric ones. We edge the edges with braid. We leave the “extra” ends of the braid free.
4. We “put” a carabiner on one of the free ends of the tape of each corner. We cut off the ends of the braids with the cuts inward. When all the carabiners are inserted and the ends of the braids are pinned into loops, you need to do a fitting in the cage. Adjust the length of the loops. Cut off excess braid. Cut again with the cuts facing inward.
Sew each loop on a sewing machine.
5. Turn out the loops, cut off the allowances close to the seam. Check the hammock for any loose threads and cut them off.
Source
Step-by-step manufacturing instructions
- The first step is to “build” a swing platform for the hamster. On a comfortable but flat surface (table) we lay out small sticks in the amount necessary to create a seating platform. Considering the width of the shelves, you will need from 10 to 15 sticks.
- The second step is to attach the seat or platform. We take two more sticks, apply glue along their entire length to one of the sides and glue them across both edges (sides) of the platform on the right and left. After the glue has dried, the seat is complete.
- The third step is to make frames to strengthen the swing. To make frames you will need 6 ice cream sticks, but large ones. Making triangles. You will need two of them: we glue every three sticks together at the corners. After the glue has dried, the frame is prepared for further use in making a toy.
- The fourth step is making the frame mount. To make a mount for the frame we need two pancake sticks. With their help, we attach the two edges of each triangle, using glue, to the edges of the sticks. Such strengthening of the frames will allow the swing not to fall apart or collapse under the weight of the animal.
- Fifth step - prepare a fastening (ropes or threads) with which we secure the platform to the swing. To do this, measure the distance or height at which the seat platform will be located from the ground. We cut off two identical pieces of the seat fastener (in our case it is a thick thread, a thin rope, but you can also use a narrow braid, a thin cord or just small beads), taking into account the fact that all ends of the fastener should be secured under the bottom with the platform itself on each side .
- The sixth step is to secure the ends of the fasteners (various options) under the platform. To do this, we glue both ends of the fastener under the platform seat on each side - first on one, and then on the other.
- The seventh step is making the crossbar for the swing. Now it's time to use a round stick. This is what will serve as the crossbar of the swing for the hamster. Before attaching the crossbar itself, place it under the strings (attached to the platform), and then secure each end with glue to the top corner in the frame.
- The eighth step is securing the platform itself. After the glue has dried in the places where the crossbar is attached, align the platform horizontally to the base of the swing and secure the places where the threads touch on the crossbar using glue. Fixing the points of contact between the threads and ropes will allow the platform to remain in a constant place, without moving to the edges, but at the same time swing up and down.
