How to install (attach) a drinking bowl for a hamster
Let's look at the five simplest and most accessible ways to attach a drinking bowl.
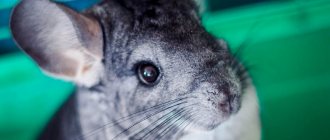
Did you know? Hamsters are distinguished by good intelligence - they remember their nickname, distinguish between relatives and can learn to perform several tricks.
- If you have a drinking bowl with a hole in the lid for fastening, then just make a double-sided hook from a piece of wire. On one side we make a larger loop for attaching to the edge of a cage or container, and on the other side we attach a drinking bowl to a small loop.
If the drinking bowl comes with a mount for the cage, then a large office clip will help to attach it to the container. We take out one wire and make a loop of the same shape, but larger, from a long piece of wire. We hook the drinking bowl mount to the loop we made. We attach the clamp to the edge of the container. We insert a new wire into the clamp along with the drinking bowl.
We make a stand for the automatic drinker from a large, thick plastic cup. The diameter of the bottom of the cup should be slightly larger than the diameter of the automatic drinker. Turn the glass over and place the drinking bowl in the center. Mark the outline of the hole for the automatic drinker at the bottom of the cup with a marker and cut it along the marked line. On the side of the cup we mark and make a hole for the straw at the desired height. We insert the automatic drinker into the made stand and place it in the container. You will need a plastic bottle with a slightly larger diameter than the drinking bowl. Cut off the bottom of the bottle and part of the side so that it can be installed in the bottle. We make a small hole on the edge of the bottle for attaching the wire and a small hole in the bottom for the tube. We place the drinking bowl in the bottle and attach it to a wire hook, hanging it in the container.
We make a stand from a toilet paper or paper towel roll. Using a marker, mark the contours on the side of the sleeve and mark the hole for attaching the wire, and cut it out. To place the drinker, cut a small semicircle at the bottom of the sleeve for the spout of the drinker. We insert the drinker into the stand, thread the wire through the hole and hang it over the edge of the container.
Paper, cardboard and whatever is at hand
The simplest toys can be made in a minute. For an unpretentious animal, just crumple up and roll a paper towel into a ball. If there is a treat hidden in it, the animal’s joy will know no bounds.
Cardboard tubes left over from towels and toilet paper are also interesting for a guinea pig, especially if you put hay in them. We bought a dozen eggs in a tray, don’t throw away the container, because there’s a pig living in the house. Wash, dry, add hay and a few nuts, close and give to your pet. The toy will last him for several days.
Paper egg racks are an excellent material for toys. First, heat them in the oven at 60 degrees to disinfect them. Then cut them out, glue the boxes, cut holes so that the pig can see the treats placed inside. String shaped cardboard cut into small pieces, making something like beads.
Socks tend to hide. If left alone, wash well with laundry or baby soap. Fill it with hay. Another toy for your pet. You can simply cut old things into pieces and put them in a cage, scattering them in different places. You just need to use natural fabrics.
Boxes are used depending on the size. They turn upside down and a door is cut out of them. They are laid on their side and covered with a fringe hanging from above. Placed on the bottom. The main thing is to cover them with soft cloth and add hay. Making toys with your own hands is interesting and fun. The main thing is to love the guinea pig and use your imagination.
What are there
All drinkers can be divided into two main types: external and internal. External ones are mounted on the outside of the cage; they are suitable for small cages as they do not take up useful space. The internal ones are attached inside the cage.
When choosing a drinker you need to consider:
- size;
- required volume of water;
- reliability;
- durability;
- durability and safety of the structure;
- fastening method;
- aesthetic characteristics.
- floor - placed in a cage directly on the floor or stand. This can be any deep bowl, preferably heavy so that the hamster does not knock it over. The main disadvantage of this design is the rapid contamination of water and the unstable design; you will have to frequently clean the cage and change the water;
- hanging - attached to the cage. It can be an open drinker in the form of a deep container with a fastener, but most often hanging drinkers are made closed;
- vacuum - consist of a narrow container for water and a wide tray with high sides, they are made of plastic or silicone. Water from the container slowly flows into the pan. The disadvantage of this design is that the water in the pan becomes dirty and must be washed periodically. A hamster can also chew through light plastic or silicone;
- nipple - consist of a flask with water and a tube with a locking mechanism on a spring. The water is in a closed container and is supplied through a narrow tube only when the animal’s tongue presses the locking mechanism. Disadvantage - you need to teach the hamster to use the drinking bowl;
- ball - the design is the same as nipple, only they do not have a spring lock, water flows when you press the ball, according to the operating principle of a simple washstand;
- bottled with a water tank, from which water slowly flows out through a small hole and accumulates in a special tank. Over time, the water in the tank becomes dirty and must be washed frequently.
Important! The most convenient are ball and nipple sippy cups; the water in them is not contaminated and there is no need to change it often
Floor-standing
Floor-mounted ones in the form of a deep bowl are the simplest, they are easy to clean, but you need to frequently change the water and clean the cage. It is advisable to use heavy ceramic or metal containers; the hamster easily knocks over plastic ones and can chew through them. You can place a bowl of water on a heavy stand.
Some models of bottle and nipple drinkers are placed on a special stand on the floor inside the cage. Original shapes and bright colors of stands can decorate a hamster’s home.
Hanging
There are a lot of hanging devices for a hamster, depending on the method of attachment and the materials used. You can hang the drinking bowls by the edge or by individual elements of the cage or container, inside or outside, it all depends on what kind of cage - made of vertical or horizontal rods, glass, etc. Such models are stylish and compact, they save space in the cage, and are reliable and do not require constant monitoring.
Bowl as a drinking bowl
Another option, which has its supporters, is a regular bowl or other container that is placed on the floor of the cage. Pros of a bowl for guinea pigs:
- Easy to clean and use.
- While drinking, the pet's head is in a natural position.
- Price. As a rule, bowls are inexpensive, and it is also possible to use a container of a suitable size already existing in the house.
The bowl has one drawback - its design is prone to clogging and spilling. The pig, running around the cage, throws sawdust and waste to the sides. All this ends up in the bowl, which creates the need for frequent water changes. In addition, despite the frequent use of containers made of heavy materials (ceramics, metal), water can splash out onto the floor of the cage, and the pig will be forced to stay in dampness. A wet surface creates a danger to your pet's health. In pet stores, you can purchase bowls with a special fastening that will prevent the possibility of overturning.
Both options are equivalent. The choice is made based on one’s own preferences or the size of the cage: it is better to place a hanging one in a small one, and a floor-standing one in a large one.
Automatic drinking bowls
There are two types of drinking bowls for rodents: ball and reed.
Their design provides a mechanism for attaching to the cell wall. Thanks to this, automatic drinkers take up less space.
The design of a ball drinker for rodents is such that a metal ball is placed in its spout, which prevents water from flowing out, and when you press it, the liquid enters the pet’s mouth.
The disadvantage of this device is that the ball sometimes gets stuck in the tube and the pet is left without drinking water. Another inconvenience is that the drinking bowl opens from the bottom, and in order to fill it with water, it must be disconnected from the cage each time.
It is convenient if the spout of the drinker is made of metal, since rodents quickly break plastic with their sharp teeth.
Reed drinkers are designed differently. In them, the ball is replaced with a tongue, when pressed on, water begins to flow. This design is more convenient and reliable. With such a drinking bowl for rodents, your pet will not be left without water. The drinking bowl opens from the top, and to fill it with liquid, it does not need to be pulled out of the cage every time.
In an automatic waterer for rodents, the water stays fresh and clean longer. But don't forget to remove it and wash it with a sponge and dishwashing liquid at least once a week.
When buying a drinker, choose a transparent one. It shows the level of water remaining in the container.
Another convenient thing about automatic drinking bowls is that they come in different sizes. And for any cage and any animal you can choose the right one.
Some drinkers come with wire fasteners that allow you to hang them from the ceiling of the cage so that they hang freely from it. This is an inconvenient option, since it will be difficult for the animal to drink due to the fact that at the slightest touch to the drinking bowl, the container will sway from side to side.
One more word of caution. The plastic from which the drinker is made should not have a chemical odor. Unfortunately, many manufacturers are guilty of using low-quality materials, and this can negatively affect the health of your pet.
Upbringing
The first thing you need to do after taming a guinea pig is to teach it good manners.
Do not damage property
The need of rodents to grind down their teeth often leads to the fact that the animal, while walking around the apartment, chews furniture and spoils the owner’s things.
Pigs are partial to wires
To prevent this, the owner must take precautions:
- Do not leave the animal unattended during walks.
- Do not place your pet's cage near objects that your pig can easily reach.
- Do not allow the animal to escape from the cage. The house must be securely locked.
If it has been noticed that the pet is showing interest in a particular item, then it is better to treat it with a special composition: gel, spray, cream with a bitter taste.
The product is absolutely safe for rodent health. It is necessary to apply the drug to the same place regularly.
To prevent the animal from gnawing on the owner's property, it must have enough of its own dental simulators. It is necessary to provide your pet with branches of fruit trees, compressed food, raw vegetables and other devices for grinding teeth.
How to make a rack for guinea pigs with your own hands
As already noted, in order to provide your pet with such luxurious living conditions, large material investments are not required. You can make a comfortable rack for guinea pigs with your own hands. Wood should be preferred as a material:
- boards;
- plywood;
- OSB boards;
- Chipboard.
The last option is the best, especially if the chipboard has a laminated coating. This material has the greatest moisture resistance among others. Wooden materials allow you to construct a shelving unit with an interesting unique design and shaped decorative elements.
You can only use smooth boards - protruding knots will injure your pet. The wooden structure should be coated with varnish or paint so that the pig does not chew the structure.
Preparatory work
Before starting work, you need to “arm yourself” with the necessary materials and tools:
- Chipboard or boards;
- plywood;
- glazing beads or slats;
- jigsaw or wood hacksaw;
- pencil;
- tape measure;
- electric drill;
- self-tapping screws;
- plexiglass (6 mm thick);
- glass cutter.
To create shelves less than 1 m long, chipboard or boards 1.5 cm thick are suitable. If the shelves are longer than 1 m, you need boards or chipboard 2-2.5 cm thick. In addition, you will need to strengthen them with additional slats. The recommended shelf width is 25–50 cm.
Before purchasing the necessary materials, you need to think through the location of the rooms and compartments, determine their sizes and draw a detailed drawing of the future shelving. The number of shelves and their length are determined by their location and the number of intended occupants. Two tiers 1 m long and half a meter wide are enough for two animals.
Manufacturing of the structure
The step-by-step procedure is as follows:
- Cutting out the main structural elements from chipboard or boards - bottom, shelves, side walls.
- Cutting out the back wall from plywood.
- Cutting holes in the shelves so that the pig can move from floor to floor. The width of the openings should correspond to the dimensions of the animal.
- Cutting out the front sides from plexiglass.
- Creation of plywood stairs connecting tiers.
- Fastening the walls (side and back) to the bottom. To do this, holes are drilled in them using a drill, after which the parts are connected using self-tapping screws.
- Installing shelves (also using a drill and self-tapping screws).
- Equipment for the interior of the house - securing stairs, installing feeders, drinking bowls and other elements that require securing. Then the bed and other furnishings provided are placed inside.
- Fastening glass edges using glazing beads or slats.
Now all that remains is to make the bedding, fill the bowls and let the furry new settler inside the house.
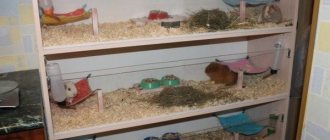
Choosing and arranging a home
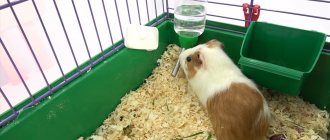
To keep your pet, it is advisable to purchase a plastic or metal cage - it is easier to wash and disinfect. The cage size is at least 0.5 square meters. m for 1 individual. The bottom of the cage should be solid so as not to damage the paws when moving. Sawdust is placed on the floor in a layer of 1–1.5 cm, which is changed regularly. A drinking bowl and feeder, as well as items for games and recreation, are installed inside.
Cage or aquarium
An aquarium is an almost enclosed space. Air enters it only from above, which increases the temperature inside and worsens gas exchange. The disadvantage of an aquarium is that the pig constantly lives at elevated air temperatures, inhaling vapors from urine and feces. This is bad for your pet's health. Among the advantages of such maintenance is that the aquarium does not absorb odors after cleaning and satisfies the skinny's need for warmth - it requires 4 ° C higher than for representatives of woolen breeds.
When keeping a cage, you need to take into account that the cage should be spacious, non-traumatic and easy to maintain. Height is not an important parameter, since an almost 2-kilogram pig is unlikely to climb anywhere. The length is much more important - it should not be less than 100 cm, since the pet needs room to run.
We recommend that you learn how to choose and arrange a cage for a guinea pig.
Accessories
You can find very attractive cage options on sale, or purchase a long cage and customize it to suit your pet’s characteristics. The cage must have:
- house;
- drinking bowl;
- feeder
The floor is sprinkled with sawdust. The pet’s natural needs are managed in a bedding made of sawdust, which needs to be changed as it gets dirty. In large cages, a pig may choose a corner or several for the toilet. Regularly replacing sawdust in these corners will eliminate the smell without wasting bedding material.
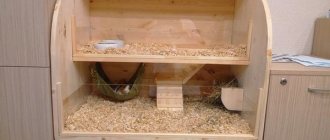
In the side part of the cage you need to build a “house” - a fenced area with a roof:
- height – at least 8 cm (animal height – about 7 cm);
- width – along the width of the cell;
- length – about 16–20 cm.
The house must have an entrance. A drinking bowl is installed on top of the structure so that the animal does not pollute the water with sawdust. The feeder is placed in the side niches of the cage or on a hill in the corner. There is no need to keep the sand bath in the cage for grooming. It is better to place it in the cage 1-2 times a week for the whole day. This will reduce your costs for sand and cleaning the cage.
Did you know? The guinea pig sleeps with his eyes open. To sleep, 8–10 minutes are enough for her, after which the next 3–4 hour stage of wakefulness begins.
Singles or need a couple
Pigs are kept both together and individually. Among the opinions on forums you can easily find arguments both for and against keeping several pigs. Opponents of shared content argue their point of view by saying:
- a pair of a boy and a girl means frequent births for the female and the need to place the offspring somewhere;
- a pair of two boys may fight frequently;
- livability depends on the individual characters of each individual.
Proponents of cohabitation often say that a pet is bored alone and needs to communicate with its own kind. There is no scientific evidence for this fact, but it is worth considering that in the wild, pigs live in flocks of 5–10 individuals, dig holes together and, naturally, intersect in the same territory.
Therefore, the answer to the question of whether to have two pigs or one depends on your personal preferences.
Types of drinking bowls: advantages, disadvantages, features
Nipple
The most convenient and common option. This is a small container equipped with a straw. There is a nipple installed inside the tube - a special ball on a spring. The structure is suspended from the bars of the cage. When the animal is thirsty, it approaches the drinking bowl and presses the ball with its tongue. The nipple is triggered and a small portion of liquid enters the mouth.
It is difficult to train a hamster to be independent, especially to press the ball. The main drawback appears - not every animal will like a nipple drinker.
From a whole bottle
A simple and economical version of a drinking bowl for a hamster. The design consists of a plastic or glass bottle and a straw for juice. The device is suspended inside the cage, or on the back side. The animal has access to fresh and clean water at any time.
As in the previous form, there is a key drawback - the hamster must learn to use such a drinker.
From a cut bottle
This type of drinker involves trimming the bottom of the bottle. The structure is suspended from the cage bars from the reverse side. The tube is inserted between the rods inside the house. The device operates on the principle of drinking from a single bottle.
Sippy cup from a pet store
Purchased containers will last much longer, unlike homemade ones. The cost of nipple sippy cups ranges from 100 to 250 rubles. Automatic accessories are more expensive - from 250 to 700 rubles. There are branded models whose price is more than 1,000 rubles.
A significant disadvantage of a sippy cup from a pet store is that it is defective. Every third person buys a low-quality product. An additional disadvantage of purchased products is the refusal of sellers to accept the goods back. For example, if the sippy cup is damaged or does not fit in size.
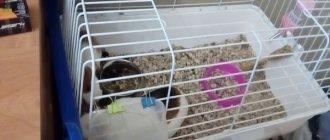
Floor drinking bowls
Place in a cage on the floor or stand. The drinking bowls look like a deep, heavy bowl. The hamster gets 24/7 access to water. The bowl is easy to wash and the water can be changed quickly.
The main disadvantages of the floor product are instability and constant water pollution. The person spends a lot of time cleaning the cage, and the hamster drank only fresh water that was safe for the body.
Drinking bowl with pocket
This design consists of a water container and a lid with a pocket spout. The hamster drinks only water that accumulates in its pocket. The water supply in the tank always remains clean. A drinking bowl is installed in the cage. Has the following advantages:
The disadvantage of a drinking bowl is that the liquid in the pocket gets quickly contaminated. Rodents throw sawdust into the drinking container during active play. If you do not clean the spout in a timely manner, the animal will be left without anything to drink.
Vacuum drinking bowl for hamster
Installed in a cage. Looks like a bird's cup. The container is placed in a deep bowl. Water comes in small portions. Hamsters quickly get used to the design due to its ease of use. The accessible drinking part rarely becomes dirty.
The disadvantage of a vacuum drinker is the material used. Animals easily chew through soft plastic.
Automatic sippy cups
They are divided into two types - ball and nipple. Flasks are made of plastic or glass. There is a tube at the end of the container. The drinking bowl is attached to the outside of the cage and works on the principle of a washstand. The design is disassembled and easy to clean.
The main disadvantages of an automatic device are defects and the need to teach the hamster to use the spout.
Accessory made from a single bottle
You can make a sippy cup for your pet from the most ordinary plastic bottle. For manufacturing you will need to prepare the following materials:
- Plastic bottle. The volume needed is small, no more than 350 ml.
- Stationery knife.
- Pen or pencil.
- A drinking straw, the most common one.
- Glue "Moment".
Assembling such a structure is extremely simple; even a schoolchild can do it. Just a few steps and your pet’s water bowl will be ready for use:
- Mark on the cork where you will make the future hole. To do this, outline the tube with a pencil.
- Make a hole in the cork; it should be slightly smaller than the tube.
- Cut the tube, the corrugated section should remain. Only a few centimeters should be left below the corrugation.
- Pass the tube through the hole in the lid and apply glue around the perimeter. Leave to dry.
That's all, your homemade drinking bowl is ready. After pouring water into it, you will see that the water will gradually drip, so you need to substitute the bowl. Your pet will always be able to drink clean water.
Accessory from a cut bottle
This accessory is made from the same materials and according to the same algorithm as described above, but only the bottom of the bottle needs to be cut off. In this case there are positive and negative sides:
- If we talk about the advantages, then you will not need to remove the drinking bowl every time in order to fill it with water. Water can simply be poured through the cut bottom; from time to time you just need to wash the accessory.
- One of the disadvantages is that if you handle it carelessly and miss the drinking bowl, you will spill water. The rodent can also get to the open top and get wet.
How to do it yourself?
If you can’t buy a drinking bowl in a store, you can try making one yourself at home. This process is absolutely not complicated and does not require any special skills.
In addition, the design will require only available or inexpensive materials. They can be found in almost every home.
To make a sippy cup you will need a knife, a nail or an awl, and a plastic bottle. You also need to prepare a regular pen, a ball that will fit inside it but will not slip out, a spring from a fountain pen, wire for fixing the device, electrical tape, and glue. The procedure will not take too much time. Let's look at 2 options that are especially easy to do on your own.
In order to make a nipple drinker, you will need a small plastic bottle, a ballpoint pen and a ball. The ball must be selected so that it fits freely inside the body of the handle, but does not roll out of its narrowed part.
The place where it gets stuck is carefully cut off with a sharp knife so that the ball sticks out a little, but does not have the opportunity to roll out completely.
You can secure the ball with a pen spring, but not too tightly.
A small hole is made in the bottle into which the handle is firmly inserted. The convergence point should be secured with electrical tape or glue to prevent liquid leakage. After this, the structure is secured with wire to the cage so that the tube is located below and at a height convenient for the hamster.
For the second design option, you will need a plastic bottle and a drinking straw, which is inserted into a hole made in the center of the lid, with the corrugation outward. The inside needs to be cut off. We protect the structure from water leakage using glue or electrical tape. The bottle is attached to the cage with the straw down, liquid will flow through it.
Drink from a ball bottle
If you choose a ball bowl, it is important to teach your guinea pig to drink from it. Particular difficulties arise with small pigs, who first satisfy their fluid needs by eating succulent food. If there are adult pigs nearby who drink from the drinking bowl, then there will be no problems - the kids will imitate. To teach a baby you took home or an adult pig to drink after a bowl, you need to follow 2 steps:
If a pet does not drink for a long time and feels normal, then it satisfies its need for liquid with the help of succulent food.
Video about drinking bowls for guinea pigs:
24
Step-by-step instruction
Now let's look at how to make a drinking bowl for a hamster with your own hands of one type or another.
- Nipple drinkers
Perhaps the best option, which is highly recommended if you want to make it for your pet yourself. You will need a small plastic bottle - half-liter or liter, a body from a regular ballpoint pen, a ball from a bicycle bearing, a weak spring from a fountain pen and a thin stick (even a lollipop will do).
Here's what you'll need to do:
- Place the ball from the bearing into the handle body. Measure the place where it is stuck, and this must be done so that the ball protrudes a little, literally a millimeter, above this mark;
- then remove the ball and saw off part of the body along the mark using a hacksaw;
- put the ball back, then connect the spring with the lollipop stick and also install it inside the prepared body;
- fix the stick on the reverse side so that it, together with the spring, acts as a stop;
- then make a hole in the bottle and insert the manufactured structure;
- Seal the joint thoroughly to prevent water leakage.
You can make a drinking bowl yourself
It is better to use sealant as a waterproofing agent. The glue takes a long time to dry, and besides, it is very toxic, especially for the weak body of a hamster.
- Drinking bowl from a plastic bottle
A very simple and popular solution. This option is perfect for a large and friendly hamster family or for large hamsters that consume a lot of water. Ideally, it is best to take a 0.5 liter bottle.
The process of making such a drinking bowl is extremely simple. You will need to unscrew the cap and make a small hole in the center. It can be drilled or pierced with a hammer and nail, but it is better to heat the nail and melt the hole.
To make a drinking bowl from a plastic bottle, you must follow the instructions
After this, insert a regular cocktail tube into the resulting hole. It is advisable that its diameter be larger than the diameter of the hole - this will help avoid water leakage and the need to solve this problem. If, however, the straw turns out to be smaller than the hole, you will have to seal it using the same sealant or glue.
The straw must be inserted so that the end with the corrugated element is on the outside.
- Drinking bowl from a cut bottle
The manufacturing technology of such a drinking bowl is similar to the method described above.
But there is one important difference - you will first need to cut the plastic bottle into two parts. Its lower part will not be needed in the future.
You can cut the bottle with a stationery knife - this is the best option, and this task is performed very easily. If this tool is not at hand, you can take scissors or a regular kitchen knife, but it is recommended to warm them up first - this will allow you to cut the plastic more evenly and quickly.
The main advantage of a drinker made from a cut bottle over a design made from an uncut bottle is that you don’t need to disassemble anything to replenish water supplies - just top it up. But you need to remember that it is strongly recommended for any breed of hamster to change the water at least once every two days. So in any case, you will have to remove the homemade drinking bowl to change the water.
- Floor drinking bowls
Here you don’t need to have any skills at all, since such a drinking bowl for a hamster can be made very quickly with your own hands. But such designs also have a number of disadvantages. First of all, it is very easy to knock them over; therefore, all the water will fall on the litter, which will have to be taken out and dried for a long time. It should also be noted that the water will quickly become polluted. It will have to be changed at least once a day - and this is not always convenient for the person himself.
This drinking bowl for a hamster is very simple, but not very convenient.
How to avoid this? First, you need to make higher sides so that water does not overflow over them. But the height must be optimal so that the rodent can reach the water without climbing into the drinking bowl. One or two centimeters will be enough. Secondly, attach the container to some heavy object, for example, a wooden block - the hamster will not be able to knock it over.
Peppermint treat
Ingredients:
- 1 medium overripe banana.
- 2 chicken eggs.
- 3 tbsp. spoons of honey.
- 3 tbsp. tablespoons of liquid coconut oil (can be replaced with sunflower oil in the same amount).
- 1/2 teaspoon mint flavoring.
- 1/2 teaspoon baking powder.
- A quarter cup of carob (roasted carob powder). A small amount of cocoa can be substituted, but this is not recommended for animals. Therefore, try to find an original product.
- Oat flour.
Cooking procedure.
1. Mash the banana in a bowl.
2. Beat eggs into the resulting mass, add honey, baking powder, cinnamon and coconut (sunflower) oil.
3. Add oatmeal to the mixture to form a firm but slightly moist dough.
4. Divide the resulting volume into 2 equal parts.
5. Pour 1/4 cup of carob powder into one half, and add the same amount of flour to the second half. A hard lump should form that does not stick to your hands.
6. Roll out 2 rectangles, 9-10 mm thick.
7. Place the layers of dough on top of each other and roll along the long side. Wrap the resulting sausage in plastic wrap and put it in the refrigerator overnight.
8. Preheat the oven to 180 degrees.
9. Cover a baking sheet with parchment paper.
10. Remove the film and cut into 3-3.5 cm rounds.
11. Place on a baking sheet. During cooking, portions of dough will not increase in volume, so you can place them close to each other.
12. Bake for 10-15 minutes.
If you want to please your pet with a crunchier treat, cut the rolls into thin slices (about 1 cm), and after cooking, additionally dry them in a warm oven or even in a non-stick frying pan.
The finished product is stored for a long time in a dry place. So, by baking peppermint rolls once, you can treat your four-legged pupil with them for a long time.
Bon appetit to your dog!
I like it I don't like it
Kinds
- Ball drinker
- Ceramic bowl
The table shows the main points showing the advantages and disadvantages:
| Ball drinker | A bowl | |
| pros |
|
|
| Minuses |
|
|
When purchasing a drinking bowl, you should consider the conditions in which your pet lives. If your guinea pig's home is large, then a bowl will do just fine. If the furry house is small, then a ball drinker will be convenient, because... it saves a lot of space. As for convenience, bowls have been developed that have attachments to the cage. By securing it in this way, you can avoid water spills.
Fluffy doesn't drink, what should I do?
There are cases when an animal refuses water from ball drinkers; let’s look at the most common reasons for refusal:
- If a rodent previously used a drinking bowl and suddenly stopped, this may indicate a disease. Be sure to visit a veterinarian.
- No experience - if your pet has always drank from a bowl, he may simply not understand what to do with a new thing. But kids often imitate their elders and learn on their own.
- If you have replaced the home with a new one, the rodent will not immediately be able to detect the source of water, just point it in the right direction.
- If you are sure that the animal is healthy, but still refuses to drink, the quality of the water or the contamination of the bowl/drinker may be to blame. Try washing the device and changing the water. Guinea pigs normally consume about 200 ml of water.
There are times when a guinea pig does not drink and there is a loss of appetite, this mainly indicates that the animal is sick. A loving owner should not ignore these signals. Such periods may occur when the season changes: try to eliminate the blues on your own and boost your immunity by preparing a vitamin puree. Grind the lettuce, feed and add a little water. Feed the animal every 3-4 hours using a syringe. Give clean water after feeding.
How to make a drinking bowl for a guinea pig with your own hands
Although you can buy a drinking bowl of any type and for every taste in pet stores, it is possible, without spending extra money, to make a hanging drinking device with your own hands. It's not that difficult to do. In addition, when making your own means of watering an animal, it is possible to adapt it to a specific cage.
Learn how to make your own guinea pig play accessories.
Nipple from the handle body
The design of an automatic nipple drinker, made by hand from the plastic body of an ordinary ballpoint pen, has proven itself very well.
To do this you will need the following materials and tools:
- plastic body of a cheap ballpoint pen;
- a ball from a bearing, whose diameter allows it to freely pass into the handle body;
- hacksaw;
- sandpaper or file;
- needle file;
- a spring from a ballpoint pen;
- wooden peg.
The manufacturing process of an automatic nipple drinker is not very complicated:
- You need to lower the ball into the pen body.
- At the tapering end of the pen body, mark the bottom edge of the ball.
- Using a hacksaw, cut off part of the body according to the mark.
- Having lowered the ball back into the body, check its position - it should be flush with the sawed edge of the handle.
- Using a file or sandpaper, grind off the sawn edge by a millimeter.
- Again you need to lower the ball into the body - it should protrude a millimeter from the hole.
- Blow into the housing, checking if air passes through.
- If air passes through, you need to use a needle file to free the hole from burrs.
- When the air stops passing, the drinker is ready for use at low water pressure.
- If the drinker is connected to a system with high water pressure, it is necessary to make some additions to it to neutralize this excess pressure, which may prevent the animal from using the device.
- To do this, you need to lower the spring from the ballpoint pen in which it is provided into the body of the pen with the ball already there.
- Following the spring, a rectangular wooden peg must be inserted into the body, which will allow water to pass to the ball, while reducing its pressure. The peg is lowered until it comes into contact with the spring, fitting tightly into the handle body.
Video: how to make a nipple drinker yourself
From a plastic bottle
This type of drinker is made even simpler than the previous one using:
- small plastic bottle, but not less than 250 ml;
- drinking straws equipped with a corrugated elbow;
- scissors;
- hammer;
- nails 120 mm long;
- thin wire.
Did you know? Guinea pigs sleep several times a day for only ten minutes.
To make such a drinking bowl you need:
- Cut off part of the drinking straw so that about 2 centimeters remain after the corrugated elbow.
- Using a nail, make a hole in the bottle cap into which the tube would fit as tightly as possible.
- Insert a tube into the hole so as to avoid liquid leakage.
- Fill the bottle with water, screw on the cap, and tilt the straw down 45 degrees.
- Turn the bottle upside down, and from the end of the tube, which is now pointing upward, pull water with your mouth, thereby removing the air from the tube. Now the guinea pig can quench his thirst at any time by drawing water from a straw. And the upward bend of the tube protects against spontaneous leakage of liquid.
- Attach the bottle to the outside of the cage using wire.
What should the water be like?
Guinea pigs drink often and a lot, so it is important for your pet's health to monitor the condition of the water.
Temperature
Ice water can cause pneumonia, so choose room temperature.
Quality
Using tap water, filter it.
Freshness
Change the water at least once a day, and if possible increase it to 2-3 times. You should not feed your guinea pig stagnant water. Accumulated bacteria will lead to serious illness.
Traveling with a Guinea Pig
What should you do with your guinea pig if you need to leave temporarily?
As is the case with any animal, the acquisition and subsequent maintenance of a guinea pig, that is, a living creature, means daily care for it, its regular feeding and care. Animals kept alone especially require constant attention.
If you bought a young guinea pig, then for five to eight years, perhaps ten or more (this is the life expectancy of these animals), you communicate daily and, of course, become attached to each other. But don’t worry if you have to separate for a while: a guinea pig can easily tolerate separation if, in the event of a vacation or for some other reason, it is temporarily given to friends, to an animal shelter or to a pet store.
Travel in comfort
In certain life situations, the owner of a guinea pig may have a problem: take the guinea pig with you on a trip or leave it in someone else's care in your absence.
If you decide not to take your pig with you on the road, find someone who will conscientiously take care of your pet. Consider into whose hands the animal will fall, since if not properly cared for, the pig can get sick and even die. It must be taken into account that for a pig, separation from its owner, even short-term, will be extremely stressful. To reduce stress factors, it is necessary to leave the pig in the cage in which it is accustomed.
If you decide to take your pig with you on a trip, you must ensure that the animal is protected from drafts and dampness. To make sure your pig is less irritated by various external factors while traveling, it is best to cover the cage with a loose napkin or scarf. In this case, the pig will not experience oxygen starvation.
Instead of a cage, you can use a special transport container that contains your pet! will feel comfortable. You just need to let the pig get used to it a few days before the trip. The advantage of the container is that it is best suited for transporting animals over long distances. Typically, containers are made of synthetic material and have a ventilated lid. All you have to do is choose a model in the store that protects your pig from drafts.
In extreme cases, an ordinary cardboard box with a sufficient number of holes made for ventilation can be used to transport a pig over a short distance.
It is necessary to lay a bedding of hay at the bottom. It is better than shavings or pieces of paper, since the pig has the opportunity to chew on the hay and calm down.
If the animal is shy, then it is best to transport it in the dark, so it will feel better.
During the cold season, it is necessary to take care of warmth for the pig. To do this, you can cover the cage with a blanket or a warm scarf. A bottle of warm water that can be placed under the cage or in a container will also help.
And one last thing. If you are planning to travel with your pet to another country, then find out in advance the requirements for transporting pets and the rules for importing them into this country, collect the necessary documents and give your pig all the necessary vaccinations.
Additional accessories
There are certain products for guinea pigs that are aimed at diversifying the animals' lives. These include various kinds of toys, comfortable loungers or hammocks.
Toys are not just for kids!
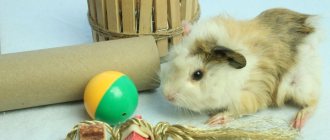
Guinea pigs are playful animals. Pet stores offer a large number of balls and coils that make ringing sounds when rolled.
Tunnels
An active animal needs certain sports activities. Guinea pigs have a special affinity for tunnels: they are made of fabric or plastic, and the rodent will actively move in them. You can connect several parts, thereby constructing a labyrinth. A curious animal will be happy to explore it. You can make a tunnel yourself.
DIY tunnel equipment sequence:
- Take a metal wire and make several rings. Their diameter should allow the guinea pig to move freely between the elements.
- Each ring is covered with thick fabric. Fleece is often used for this purpose.
- The rings need to be connected to each other. For this purpose, fabric pieces are used.
- The edges of the rings are equipped with hooks. This is necessary to secure the tunnels to the rods.
For the maze, you can use cardboard or thick paper. An ordinary box is taken, holes are made, various kinds of barriers and places for shelter are equipped. This will be worthy entertainment for the rodent, but, of course, not for long: the animal will chew it with the same joy.
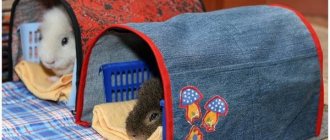
A lounger - to have somewhere to rest after the game!
To sleep, guinea pigs climb into the house. But rest can also take place on special beds. You can make interesting mattresses yourself or purchase ready-made options at pet stores.
How to make a sleeping bag for a rodent:
- Take fabric from which squares are cut out. Their sizes are determined by the dimensions of the guinea pig. Traditionally, 10 cm should be added to the body length.
- The inside of the bag is equipped. A soft cloth is used for this.
- The top of the bag is covered with padding polyester. Leave 10 cm on the side of the hole.
- A denser material is used for the outer part. The inner part together with padding polyester is placed in the outer bag.
- The previously left 10 cm of fabric is wrapped and hemmed.
A sleeping bag will serve as a reliable shelter for your guinea pig. That is why animals often prefer them to a house. The products will have to be washed frequently, so the fabric must be prepared for this: you need to choose a thick, good quality option. Bags of bright and unusual colors will look stylish.
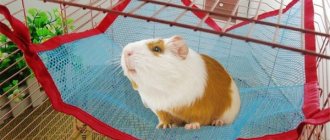
Hammock - heavenly pleasure!
You can hang a small hammock in the cage for your guinea pig. This is a convenient product where your beloved pet will love to relax. The hammock is hung at a height of 10-15 cm. Otherwise, the animal may suffer if it falls.
Outfits
Many guinea pig owners like to photograph their pets in interesting clothes, so the clothes are purely decorative. You can buy bright dresses and suits in pet stores. Some owners sew outfits to order. You can try making clothes yourself.
How to make a stylish costume for a guinea pig from a sock?
- The top of the sock is cut off down to the heel.
- There are holes for the paws.
- Next, you need to tuck the edges and stitch around the perimeter of both edges.
The decoration of the fabric depends on the tastes of the owner. You can use beads, rhinestones, buttons, bright scraps of fabric of a different color - whatever your imagination allows.
Leash and harness: for the adventurous
To walk the animal, a special device is used - a leash. The most convenient option is a model in the form of a T-shirt. It allows you to tightly fix the body of the rodent. It is more convenient for the owner to use a tape measure that has a lock. You can also purchase a simple leather leash.
Combing brush
For long-haired breeds, you will need to purchase a brush. This is a necessary element of caring for a guinea pig. It will help rid the fur of dirt and keep your pet looking neat.
As we can see, not much is needed for a comfortable life for a guinea pig: besides, not every accessory from the above is required. The main thing is that the animal is healthy, and any loving owner will think about its leisure time.
Training
Guinea pigs are trained using treats as rewards. During training, you should not make sudden movements or make loud sounds. Most pigs are able to learn only the simplest commands, while some animals are easy to train and perform more complex tricks.
Stand
This trick can be taught to almost any animal. When the rodent is in a good mood, it must be placed on a flat surface. A treat is placed above his head. Then in an even voice you must repeat “Stop!” (can be replaced with “Serve!”). The animal will notice that after completing the command it receives a treat, and will be willing to carry it out.
In just a couple of weeks, you can train a pig to respond to its name and come when its owner calls. You will also need some goodies for training. The animal is placed on a flat surface at a distance of a meter and, showing a treat, is called to you. When the pet reaches the goal, it must be rewarded. It is recommended to perform the workout daily. The distance can be increased gradually. In order for the animal to respond to its name and remember it faster, it is necessary to call the pet by name as often as possible.
U-turn
The U-Turn trick can be performed in a cage or on the floor. You must take the treat in your hand and draw a circle over the animal’s head (preferably clockwise), accompanying your actions with the command “Turn!” or “All around!” The animal must repeat the movement of the owner's hand in order to receive the treat. You can get used to a full turn gradually. First, reward your pet for turning 45⁰, then 90⁰, and so on.
Kiss
This simple trick can be taught to any rodent. You will need your pig's favorite treat and a little patience. A piece of treat is placed on the owner's lips. The pet rises to the level of the owner's head and, sensing food, reaches for his face.
Give me your paw
This command is more difficult than the previous ones. For training, you need to place the pig on the sofa. The owner sits on the floor and extends his left hand to the piglet, palm up, at the level of the sofa. There is a treat in the right hand, and the owner uses it to lure the guinea pig. Without allowing the pet to move forward much, you need to wait until he puts his paw on the open palm of the owner, and give a treat, saying the command: “Give me your paw!” To achieve success, you will have to work with the rodent regularly.
Roll the ball
To learn this trick you will need:
- tennis ball (you can use another small ball);
- a stick-shaped treat (a strip of carrot or celery).
The treat is placed on the floor and a ball is placed on it. To get the treat, the pig needs to push the ball. When she shows interest in the items offered to her, you must say: “Push the ball!” To achieve results, the exercise is performed regularly.
Jump through the ring
To carry out the command, you need to prepare a ring with a diameter of 15-25 cm. You can use a ready-made one or make a hoop yourself from wire. You can also adapt a tennis racket without a fishing line and other similar items. The edges of the device must be smooth.
The ring is positioned so that its edges touch the floor. A treat is placed on one side of the circle, and a guinea pig on the other. The owner gives the command “Ring!” and lures the pet with goodies. You can gently push the animal if it does not move on its own. When the animal passes the obstacle, it needs to be praised and treated. The hoop gradually rises from the floor, but not higher than 3 cm.
Taming
Training a guinea pig is easy if it trusts its owner, so before you teach the animal commands, you need to tame it. It is better to start taming immediately after purchasing a pet. This will help establish rules for the rodent's behavior in the house and train it to use the toilet.
How to tame a guinea pig:
- First, the pet's cage is covered with thick fabric so that it is dark enough inside. This will allow the animal to focus on sounds, smells and tastes.
- During the first days, the owner talks to the pig in a quiet, calm voice.
- After a couple of days, you can offer the animal a treat (apple, pear, gooseberry, etc.).
- After a week of getting used to it, the thick fabric cape should be replaced with a translucent one.
- The animal will gradually get used to the sight of the owner and his hand holding out a treat.
- After another week, the cover is removed. It is better to give the pig the opportunity to look around at the surroundings and leave the room for a while.