Greetings to all do-it-yourselfers, as well as dog breeders!
Today I want to share an idea for making a very simple, homemade choke leash for training young dogs and puppies.
I think every dog owner knows that any dog (both large and small) must have certain training skills and obedience to the owner. Moreover, this does not mean at all that every dog needs to be intensively trained and undergo a GCD (general training course).
If the dog is not a service dog, but is kept in the family simply as a pet and friend, then the ability to walk on a leash and knowledge of at least two basic commands: “stay” and “come to me” is enough for it. This alone makes the dog manageable and obedient, and on occasion it can simply save its life, especially in the dangerous conditions of a big city.
At the same time, it is advisable to begin raising a dog from puppyhood. Well, in order to facilitate and speed up the upbringing and training of a dog, it is very good to use a special device in the form of a leash with a strict collar or a choke collar.
It must be said that there are now a huge number of different strict collars on sale. Moreover, the basis of all these collars is the property of tightening like a noose or noose with a sharp jerk, which naturally has a certain effect on the dog.
However, such collars are often quite expensive. But at the same time, there is no particular point in buying them, since such a collar is needed only for the period of raising and training the dog.
For example, I have long been convinced that in ordinary cases, for the successful training of a dog, a very easy-to-make, homemade noose leash is quite suitable. Such a leash can be easily made in a few minutes, and it will cost almost nothing. At the same time, it can last for a very long time and with its help, you can raise more than one generation of dogs.
I've been using a similar leash for many years now. This is what he looks like.
As you can see, it can be made from ordinary rope.
Purpose of the noose leash
All dogs are different, each has its own special character. There are large dogs that behave very excitedly during walks, chasing every cat, dog or even bird. In this case, it is usually incredibly difficult for the owner to keep a large dog on a leash. It is for such dogs that a noose leash is needed, with the help of which the dog can be stopped without much difficulty. Moreover, this dog training collar fits very well.
ATTENTION! After using the choke for some time, the dog usually gets used to normal behavior and then the choke can be replaced with a regular collar.
Toy and treat
How to catch a dog? With her favorite toy or treat.
First of all, the animal is called. Not just once, but constantly called by name. Not this way: “Jessie” and look after the rapidly running away pet. And we act like this: “Jesse-Jesse-Jesse-Jesse.” The dog reacted, we immediately show him his favorite toy. We wave to her, attracting the attention of our pet.
99% of dogs react to their toys. They want to play, they want to get it. And they lose interest in the stimulus they were chasing.
The same goes for treats. The dog is shown a treat if the distance allows this.
The method is suitable for those domestic dogs that chased a cat, for example. And they did not have time to escape far enough from the owner.
If the dog is scared and rushes into the distance, not making out the road, there is no time for toys and treats. You will have to run after her, appealing to the animal’s mind by calling by name.
Features of leash training for an adult dog
The stages of training an adult animal differ from those described earlier. If a dog has spent a long time in an enclosure or a kennel cage, its training begins with a leash about 8 meters long. Work with the dog in an open area, the leash should hang freely. The leash is shortened gradually as you get used to it. Usually an adult animal does not want to walk on a short leash. Treats are used for training. When luring the dog with a tasty morsel, they make sure that it does not run ahead and block the owner’s path.
One lesson with an adult dog should not exceed half an hour in duration.
Leash training an adult dog requires patience from the owner.
Detailed Specifications
Collars differ in the material they are made from.
Before purchasing an accessory, it is important to familiarize yourself with the different types and choose the most suitable one. They are made from the following materials:
- Nylon is the most durable dog collar, glides well, does not cling to rings, and can be used in any weather. The collar has a drawback: if pulled sharply, it can cause pain to the animal and cut the owner's hand.
- Leather - beautiful and comfortable, suitable for short-haired breeds. Without proper care, the collar quickly loses its attractive appearance.
- Metal - when used, it can harm the coat, so it is intended for dogs with short hair.
Important! A dog leash with a lock, made of combined materials, is also used for training. The collar can harm the animal
Advantages and disadvantages
The noose leash has positive and negative sides. The advantages include:
- success in training;
- low price;
- ease of use.
Cons of a choke collar for dogs:
- with constant wear, it cripples the dog’s psyche;
- can damage the hair and cause harm to the pet;
- A nylon leash can cause injury to the owner or the dog.
Training a puppy using a choke collar
For some puppies, using a choke collar is a must. Still untrained puppies are distracted with the help of a noose from various external factors that interfere with training. If the noose is used wisely, it does not cause any harm to the dog, but it helps the owner cope with the still uncontrollable dog. When the dog jerks, the amount of incoming air decreases and this immediately moderates the ardor of a temperamental dog.
The noose itself looks like a regular collar, but it does not have a standard clasp. Instead there are restrictive rings. When putting the collar on the dog, it is passed through one ring and the loop is placed around the pet's neck. A leash is attached to the other ring. When it is not pulled, the collar is completely loose around the neck. As soon as the dog jerks, the leash tightens and the choke tightens, causing the dog to experience discomfort.
REFERENCE! There is also a noose collar with a lock or with three rings on sale. Their action is the same, only the third ring limits the size to which the collar can be tightened. Even with this diameter it will no longer tighten and certainly will not choke the dog.
Advantages and disadvantages of a leash
Dog owners who have chosen a leash-controller highlight the following advantages of the product:
- Unlike a strict collar, it does not cause any harm to the pet. You just need to pull the leash slightly, and the dog will understand what is required of it and will walk next to the owner.
- Allows you to gently and painlessly correct the unwanted behavior of your four-legged friend.
- Used as both a collar and a muzzle.
- It is equipped with a reliable metal fastener, which allows you to hold the collar on the neck – the most sensitive part of the dog’s body. Thanks to this, there is no need to constantly correct it. He will not slide off the dog.
- Another clip can be attached to a waist belt or bicycle handlebar. Thus, the owner’s hands will always be free, or he will be able to walk two or more dogs at the same time.
- The device has optimal weight, it is comfortable to use and hold in your hands.
- Suitable for dogs of all sizes and breeds.
- Can be used for pets starting from the age of 3-4 months.
The disadvantages of the product include the insufficiently good quality of such products, mainly in online stores (although you can still trust trusted sites). However, you can easily correct the shortcomings due to the simplicity of the design, or you can make such a leash yourself. There are practically no negative reviews for the product.
The leash controller is rightfully considered one of the most effective means of training pets. The noose does not cause any harm to the dog and does not injure it during the training process. Professional dog handlers appreciated this device. They consider it a good help in training a dog. However, before training your pet, you need to figure out how to put such a leash around the animal’s neck.
Training with the product
Usage
The choke collar is used for training dogs from 5 months. It is unacceptable to use on puppies and is not recommended for use on small breed dogs, as there is a high risk of injury to the cervical spine and suffocation.
The accessory is placed around the neck and a leash is attached to the end through which the noose does not slip. The collar should not put pressure on the neck, so it should be worn so that two fingers folded together can be inserted between it and the neck. A collar that is too tight will cause breathing problems. If everything is done correctly, then when tensioned, the loop will tighten, and after reducing the tension, the loop will loosen.
Choke collars are not intended for everyday use; they are worn only during training and training. Many dog owners purposefully buy nooses for daily walks, considering them convenient, because they hang freely and do not spoil the hair, and do not cause inconvenience to the dog if it does not pull the leash. Such use is unacceptable, because there are other types of collars for such purposes.
During the training process, you should not pull the noose. You need to show the dog that it is not he who gives the direction. The trainer, holding the leash closer to the base, walks at a normal pace, abruptly changing direction, thereby tightening the leash, the dog experiences unpleasant sensations, the trainer loosens the leash and rewards the animal with a treat, stroking or words. You should not leave an animal in a choke collar unattended. As you watch the video, notice that the trainer does not jerk the leash sharply.
Use for behavior correction and training
A dog training noose is an indispensable accessory for the owner. Because with its help you can achieve obedience in a short time. If used correctly, the collar will not harm the dog.
It is necessary to accustom oneself to such a collar from puppyhood, since an adult dog has already formed its character, and the dog can react to the noose aggressively or passively. In case of aggression, the dog is calmed down, distracted from the leash by loosening the tension. After the pet has completely calmed down, you can gradually begin studying. Over time, the pet will form a reflex, and it will stop pulling in different directions.
With a passive reaction, the dog lies down and does not pay attention to the owner’s commands. In this case, dog handlers recommend making a slight jerk and rewarding him at the slightest activity. After some time, the animal will understand that the noose will not harm it and will unquestioningly carry out its tasks.
Training a dog with a choke collar
This collar is intended for training purposes only. It is better to carry it out in a deserted place so that no one distracts the animal.
Actions during classes:
Experts recommend using a noose only during exercise, and putting your pet on an ordinary collar while walking. This is explained by:
Material of manufacture
There is a large selection of choke collars with three or two rings for dogs on sale. The material from which they are made can be leather or its substitute, metal chains, links or nylon cord. When choosing a choke for each dog, you need to study all the pros and cons of the material from which it is made.
Let's look at the collar options:
- Nylon noose It is considered the most durable collar, as it glides well without clinging to the ring. You can wear such a collar in any weather and you can even swim with it in the sea or other body of water.
The downside of a nylon collar is the possibility of causing pain to the dog and also cutting the owner’s hands.
- Leather collars for dogs are considered the most beautiful and pleasant for the owner. Leather harnesses are suitable for dogs with short hair and are very comfortable for them. The disadvantage of a leather collar is that it requires special care, or it will quickly lose its attractiveness. 3. Metal can stain dog hair where they come into contact. In addition, wool can get into the joints of the metal chain links. For these reasons, metal chokes are not used on dogs with long, light hair. They are used mainly for smooth-haired dogs. These collars look very beautiful and are used mainly during exhibitions to decorate pets.
NOTE! There are also combination collars made from nylon cord to increase durability, with the addition of nice leather.
Distinctive features of a half-garrote
The half-choke collar has another name, it comes from France - martingale . Initially, it was a belt in the harness, designed to prevent the horse from throwing its head back too high.
As dog ammunition, a martingale is the same noose, the rings of which have a chain threaded through them (most often, but sometimes a strap) to which a leash is attached. The principle of operation of both the choke collar and the half-choke collar is the same: the reins are pulled, the collar is tightened; the materials from which they are made are the same.
However, this type has certain advantages, for example, with a martingale, a dog cannot be strangled or injured like a noose, since there are two rings that determine the minimum length of the collar.
The main thing is when choosing a half-choke, choose this minimum length correctly, so you need to measure the narrowest place in girth on the neck (behind the ears). If the collar is chosen correctly, the dog will not be able to get out of it against the will of the owner.
Also, you can familiarize yourself with other types of collars: “Anti-bark”, a collar with GPS.
What is a dog show ring?
To obtain the coveted victory at the exhibition, the correct choice of show ring plays an important role. And also important is the handler’s ability to control this accessory.
A ring leash on a dog. Such leashes are present in the list of products of almost every manufacturer of pet products; there are a very large number of them on sale.
Materials and design
Rings are made from different materials. The most popular are leather or nylon leashes . You need to fasten the leash behind the pet's ears, or open it wide and lie on the animal's back, on the chest, passing through the shoulder blades.
At their core, rings are a device in between a collar, a noose and a leash. They are manufactured in a wide variety of designs. There is also a fashion for the advantages of their appearance, color scheme and material. But the right to choose it always remains with the pet owner, regardless of fashion trends.
The ringovka is made from different materials.
Gallery of show rings
A show leash is a show leash.
You need to know how to use it.
There are a large number of varieties.
The leash is attached to the ears.
The ring is not noticeable on the dog.
You should select according to the color of the dog's coat.
Sew a classic leash
For a 1.5-meter model you will need:
- tape made of sling, tarpaulin or nylon 2-2.5 cm wide - 1.8 m;
- durable carabiner with latch - 1 pc.;
- jacquard braid for decoration - 3 m;
- sewing machine, thread and scissors.
How to make a leash, step by step description:
- We insert one end of the tape into the eye of the carabiner, bend it 3 cm and wrap it inside.
- We sew the resulting three-layer hem using a sewing machine along the entire perimeter and crosswise. Be sure to make securing seams.
- At the other end of the tape we sew a handle. To do this, wrap the tape around your hand and add 3-4 cm for convenience.
- We sew the tape with a hem, forming a loop-handle.
- Fold the jacquard braid in half and cut it.
- We will attach both parts of the braid to the future leash on both sides, closing the seam near the carabiner and handle. We baste the braid or secure it with pins in the desired position.
- Sew the braid to the leash tape.
A harness is a restraining leash for dogs that is used for transporting animals or for walking with them. Such an accessory can be purchased at any pet store or made independently from different materials.
The duration of production depends on your desires and capabilities. In order to prepare the simplest accessory you will need several hours of free time. To perform such a device, you need to prepare the following equipment:
- scissors;
- strap;
- Velcro;
- needle and thread;
- roulette;
- leash.
In order for the harness to be comfortable for the animal, you must first take its measurements.
It is important to measure the coverage of the chest, neck and the distance from the chest to the neck. Then you need to cut the strap according to the data obtained into 3 parts
Two strips will be intended for girth of the animal's chest, and the third for the back. Velcro must be sewn onto the ends of long straps. When unfolded, the design should resemble the letter H. After the harness is completely ready, you need to sew a leash to it.
But many pet owners want their pets to look fashionable and stylish, and therefore they sew accessories for them from different fabrics. Below we will look at an example of how to make an accessory from old jeans. To make a harness you will need the following materials:
- the front and back of the jeans, one of the pockets, a strip of jeans for a leash;
- ring and carabiner (can be removed from the bag);
- 2 large buttons;
- 2 rivets;
- needle and thread to match the color of the jeans.
Of course, you can sew a harness with your own hands, but it is best to use a machine to ensure that the seams are smooth and beautiful. The manufacturing process is very simple, the photo shows what patterns will be needed for sewing:
Fold the strip for the leash in half and stitch it.
Attach a carabiner to the leash using clasps. If there are no fasteners, then you can stitch them well.
The dog harness is ready. Where the front of the jeans is, this side needs to be wrapped around the animal's neck. You need to try on the accessory to understand where to make the buttons.
The denim harness is ready, now you can decorate it with various accessories. Beads, rhinestones, ribbons, beads, and various buttons are perfect for this. Veterinarians also recommend attaching a card with your address and phone number to the inside in case the animal gets lost.
Leash-noose at home
You can make a pretty decent dog collar with your own hands. To do this, you need approximately 4 meters of nylon cord, 3 metal rings, glue, strong synthetic thread and heat shrink tubing.
In order to make a collar, you need to thread a nylon cord through the ring and make a pigtail of the required length, leaving a reserve. You can calculate the required length of the noose by measuring the circumference of the dog's neck and subtracting the diameter of the ring from there. When braiding a braid, you need to weave a ring that will act as a retainer. At the end of the braid, it needs to be threaded into the second ring and bent. Then the bent ends need to be scorched over the flame, connecting them behind the ring.
To make the collar more durable, the joint must be tied with thread and glued with universal glue. The ring that acts as a limiter also needs to be secured with thread and glue. If it doesn’t turn out very neatly and beautifully, you can cover the joint with heat-shrink tubing. Well, the noose is ready for your dog.
Paracord collar
Paracord is a lightweight nylon rope with a special core.
Initially, this material was used in the line system of parachutes, but is now widely used as a universal cable. A collar made of paracord is characterized by low weight, high density and excellent strength. This accessory does not fade, does not deform and looks very attractive.
For weaving you will need: a couple of pieces of paracord up to 50 cm long, a half ring and a standard fastener:
- fold the pieces in half and thread them through the clasp;
- make loops, pull the loose ends through them and tighten;
- measure the circumference of the animal’s neck using a centimeter;
- measure the length of the material according to the measurements obtained and fasten the second part of the fastener;
- the first leftmost segment is moved to the right after two segments, and the rightmost segment is moved to the left, which allows you to get a kind of figure eight;
- in the process of further weaving, the two central segments serve as a kind of basis for the resulting accessory.
In a certain place a ring is woven in for the carabiner of the leash. It should be noted that you need to purchase only high-quality paracord from trusted manufacturers. You can remove dirt from the finished product under running water using a brush and soap.
Attention! To check the quality of paracord, you need to set its edge on fire. Good material burns with a smoky flame, emitting black smoke and the characteristic smell of burnt plastic.
Do-it-yourself martingale collar
If the noose is too much for you, then we suggest making a half noose.
You will need:
- Raincoat
- Izolon or polyethylene foam
- Metal rings (can be D-shaped)
- Sling
- Optional, ribbon (for finishing)
We calculate the length of the collar - this is the circumference of the neck, minus the diameter of the ring. Add five to seven millimeters to the width of the sling and get the width of the collar.
We cut out a rectangle of the required size from the isolon, lay it on the raincoat fabric, add two centimeters to all sides, and cut it out again.
We cover the isolon with raincoat fabric.
We measure the sling 30 centimeters longer than the neck in circumference in order to firmly secure the rings.
Actually, we attach the sling to the collar blank, thread it through the rings and firmly sew the ends with a triple stitch on the machine.
Important! From one end we release the required length of the sling, pass this end through the second ring, then attach it to the side of the collar from which it comes. This is our control circuit.
The second ring can be secured in the middle of the control outline by stitching it with a cross stitch.
We remove the threads that were used to sweep away the sling with the workpiece and our martingale is ready.
Before using such collars, be sure to consult with a competent dog handler . He will give you detailed instructions and recommendations.
Taking measurements from your pet
To determine the length of the sling, taking into account all the necessary fastenings, first of all, we need to measure the circumference of the pet’s neck. If you don't have a soft sewing meter at hand, you can use any ribbon and then measure it with a regular ruler. Or just use the old collar as a guide.
You have measured the circumference of your dog's neck. We multiply the resulting value by 1.7.
That is, if your dog has a neck girth of 30 cm, multiply this figure by 1.7. It turns out that you will need a sling 51cm long. This will be the length of the main large outline.
For a small control circuit, the line should be slightly shorter. This length does not depend on what size your furry friend is. A sling length of 30-35cm will be sufficient.
The small contour only allows you to freely put the collar over your head, and then evenly distribute the load when the dog tightens and loosens the leash.
You don't have to worry that the collar will be too small or too big. To adjust the desired girth, we will later make an additional buckle on the main contour.
But you need to decide in advance on the width of the sling. The choice of sling width directly depends on the size, breed and age of your furry friend. If you have a large breed dog, then the sling should be wider and the fittings stronger.
For my Jack, I took fittings and a 2.5 cm wide sling. By the way, the size of all accessories is selected based on the width of the sling, and is measured by the width of the holes into which the sling will be threaded.
Possible errors and problems
When training, mistakes are possible, the admission of which complicates training or makes it incorrect.
- Jerk before the command is given. He knocks the dog down and doesn’t make it clear what they want from him.
- Driving a dog on a tight leash. Execution of the “nearby” command must be carried out on a loose leash, and subsequently without it, otherwise the dog will get used to the constant feeling of tension on the collar and will begin to consider this the norm.
- Giving a command with different intonation. The dog will not be able to remember all your intonations and associate them with a specific command, and a rude tone may even frighten him.
- Repeating the command when the dog walks nearby. If the dog follows a command, it should not be repeated again. This way, the pet can associate repeated issuance of a command with the norm and will carry it out only on a double command.
- The position of the dog when walking side by side is half a length forward/backward. This position of the dog makes it difficult for him to give other commands with a gesture, and also slows down the pet’s reaction to changing traffic conditions.
- Parallel study of different commands. It is difficult for an animal to learn several commands at once; it is worth practicing them one by one.
- Punishment for failure to follow commands. When teaching a dog commands, it is strictly not recommended to raise your voice or physically punish it. In this case, your pet’s training will be associated with negative emotions and will become ineffective.
Photo: Scott 97006
Photo: Virginia State Parks
Raising a dog is a labor-intensive process that requires patience and time, but the result can not only ensure its safety and save you stress, but also make your pet a well-deserved source of pride.
Interesting option
A leash made from paracord makes a great leash option - it's a very strong and durable braided leash that works well for any breed of dog, no matter their size.
Article on the topic: Tying the neckline with knitting needles: master class and schemes for working on the edges of the product with photos and videos
To make a leash from the classic Cobra knot, you need about thirty centimeters of lace to get a piece of leash of two and a half centimeters, not counting the middle. Thirty centimeters of leash will require fourteen times more cord. Based on this, approximately four hundred and twenty centimeters of lace are required, of which three hundred and sixty centimeters for weaving and sixty centimeters for the middle.
If you choose “king cobra”, then the lace consumption will be 45 centimeters per 2.5 centimeters of leash. Sometimes the exact amount of material is not possible, so it is better to take a lace with a reserve. In this master class, a leash of 180 centimeters was created, and approximately 480 centimeters of cord were used, including 45 centimeters for the handle. A total of 525 centimeters of cord were used.
Now let's look at the node in detail. First you need to find the center, it will affect the length of the leash, the knot and the distance to the carabiner. Now take one of the ends of the lace and place it above the center, leaving a loop. Now we take the second end and pass it over the 1st, but this time under the center and pull the lace up through the loop. We continue to do the same, while directing the cord in different directions, and when using the “king cobra” method, we do the usual one twice, and use it as the center - this will give more strength and volume.
To create a leash you will need:
- scissors;
- tape measure or measuring tape;
- paracord;
- lighter;
- clamp;
- rubber;
- carbine;
- a small piece of old lace;
- time, effort and job description.
We make the correct knot on the carabiner.
Related article: DIY satin ribbon crown: master class with video
The clip is wide, so you need to wrap the loop several times, and only then pull the lace through it. We make the main knot by winding and pulling once. But if necessary, we can expand it further. In this case, you will get a strong non-slip connection. To keep the carabiner in place, take an old cord and tie it using a Prusik knot:
And now it’s time for the most interesting part of weaving - creating a handle. If you understand the method of its manufacture, everything else will immediately become very simple. After we have attached the cord to the carabiner and measured the required length, we need to make a loop from the paracord cord - this will be the handle. Then we do the “Jump to the Middle”, for this we take 2 intertwined cords and begin to weave them through the lower part, where the loop connects to the leash. This is where the handle will be attached.
Behind the “Jump” we tie the handle using the “Cobra”. And we finish using the “King Cobra”. To make it more comfortable, we make a skein of lace and secure it with elastic bands. Thus, it will be more convenient to pull it into the knots without stretching the entire length of the leash, and will also save a lot of effort and time.
When the braiding of the handle is completed, you will need to go around the original center. Once again we “Jump” along the long piece and make a continuous loop.
Now you need to braid the entire lace from top to bottom. A neat appearance is important here. It will be good if you weave as close to the clamp as possible, this way the leash will become wider. The point is to perform the reverse “king cobra”.
When we braid as wide as possible at the clamp, you need to turn everything and make “Cobra” as the middle. In this case, it is necessary to stay close to the clamp so that the leash does not twist or turn in the future. We remember that around the bend you need to weave in the opposite direction.
Related article: DIY paper gun: diagrams with photos and videos
Having reached the starting point of the handle, we braid it in a circle.
When we reach the beginning of the long part, we cut and melt the lace, now we pull it tighter and cut off what is unnecessary, after making sure that the edge of the lace is firmly fixed. And now an excellent and interesting leash is ready and can delight both the owner and the pet.
This version of the leash will be more strict; it is created from a belt tape, approximately two and a half meters long. To do this, we melt the edges with a lighter, then thread the end into a metal ring, creating a handle and attaching it with a strong seam. Now you just need to put the carabiner on the ring, and the leash is ready.
How to teach a dog to walk next to you without a leash
You should start learning to walk side by side without a leash only when the dog has learned to confidently walk side by side on a leash, without straining it and maintaining the required position.
To practice walking side by side without a leash, make the leash longer and give a command when the pet walks on a loose leash.
Gradually increase the distance; when the distance exceeds 5 meters, call the dog with the command “come to me”, and only then give the command “near”. And don’t forget to reward with praise, affection or treats.
Photo: Scoutdogs (Chris)
When your pet masters the “near” command from a distance of 5 meters, you can begin practicing the command at a distance when the dog walks without a leash.
However, remember that mastering walking side by side without a leash does not mean that you can eliminate walking on a leash - the dog may gradually become spoiled and stop maintaining the distance and the necessary position in space.
How to use it correctly?
On the address book you must write down all the information that will allow you to return your lost pet home. Usually all inscriptions are applied on both sides.
- On one side they indicate the name of the dog, and along with it the phone number of the owners. The address is rarely included because it may end up in the hands of people associated with crime. Not every person agrees to risk their safety like that.
- On the back of the token or tag, you can indicate special additional information, for example, that the pet is a guide dog or suffers from some kind of illness or needs treatment. Sometimes owners use a trick and specifically indicate on the address book that their pet is seriously ill with something, so that no one wants to keep the dog without returning it to the breeder. However, such information can also play a bad joke on the four-legged dog - people may be afraid to contact him because of his illness.
Often the address cards contain information that allows other people to immediately understand that the pet is lost. In such cases, the owners prefer to write:
- “Call the owner!”;
- “Bring me home!”;
- "I want to go home!";
- “I’m lost (or lost)!”
To apply an inscription, you can turn to engraving. For this purpose, special automatic equipment is used. It acts on the part with a special diamond tip, which removes the top layer from the token, leaving very thin and neat grooves.
Much here depends on the material from which the selected address card is made. Typically, engraving is used when the product is made of metal. The softer this material is, the deeper and more noticeable the furrow will end up.
There is also a laser engraving method. In accordance with it, the top layer is also removed. Here you can apply larger and wider symbols. This method of applying text to a token is considered optimal because it gives good results and does not take up a lot of free time.
The prepared address card with all the information printed on it must be correctly and firmly attached to the collar of your four-legged friend. For fastening, it is recommended to use high-quality and tight rings with a cross-section of at least 1 mm or special carbines designed for such elements. The latter are very convenient at moments when you need to remove the address card in order to wash the collar or change it to another one.
If the sound of the token irritates you, you can use a remedy such as anti-ringing. It is made from soft silicone rubber. It fits tightly to the surface of the token, as if hugging it. As a result, the sounds that the addressee makes are inevitably absorbed, and the person stops hearing them. Anti-ringers can glow in the dark.
conclusions
It is worth remembering that the beauty of this accessory is certainly important, but its purpose is to restrain the dog. Therefore, pay more attention to the strength of materials and the quality of stitching. After all, an animal with a sudden movement can damage them and escape from your hands. If you doubt that the ring you made yourself will not be able to withstand the impulse of your pet, then purchase a leash in the store.
Show rings for dogs must be made of durable material.
Own or homeless
Let's separate the flies from the cutlets and figure it out: what kind of dog are we catching and why? If one of your own runs away - one conversation. If you have to help old ladies like this, like in the introduction, it’s completely different. It would be more appropriate to remain silent about the stray dog, because why catch him? But life situations are simply fantastic. For example, a neighbor always remembered her dog. He ran away a couple of years ago. And imagine the situation: you ran into this neighbor in the store, and you are returning home together. And she is suddenly surprised to recognize her dog in a stray dog running past. The same one who ran away many years ago.
The dog is shy because it is homeless. And the neighbor asks for help with catching the animal. How are we going to catch it?
Methods for pet dogs:
- Team.
- Imitation of the owner leaving.
- Delicacy.
- Dog whistle.
Let's talk about each method more specifically.
How to teach a dog to walk next to you without a leash
You can accustom your dog to the “Near” command without a leash no earlier than at the age of 6 months, and the pet must move well “near” on a leash.
Take a longer leash and first act in the same way as in the first stage
- give the command when the dog is walking on a completely loose leash. However, gradually increase the distance from which the command is given (if the dog is further than 5 meters from you, then first you need to give the command “Come to me”, and only then “Near”).
When the dog has learned to carry out a command from a distance of 4-5 meters, try to command when it is walking without a leash
. Remember: in order for your pet to perfectly follow commands without a leash, he must regularly walk “side by side” on a leash. If you are lazy and force your dog to walk “side by side” only without a leash, then in a week it will stop obeying.
What parameters must it meet?
The main parameters of the leash are determined by the following characteristics of the fishing line:
Breaking load. The breaking load of the leader should always be lower than that of the main line.
Color. Most anglers use clear line to make leaders because it is the most versatile.
But there are those who pay special attention to the color of the fishing line. In such a case, there are the following recommendations:
- very clear water - blue line;
- fishing in the grass - green line;
- fishing on a sandy bottom - yellow line;
- fishing on a pebble bottom - brown line;
- fishing in snags - black line.
- Length. The length of the leash is a very important parameter, which depends on the type of equipment and the fish that is the intended prey.
Depending on the type of equipment, the length of the leash varies within the following limits:
for a fly fishing rod – 15-20 centimeters; for a plug fishing rod – 10-15 centimeters; for match and Bologna rigs - 25-30 centimeters.
Depending on the type of fish, the length of the leash is:
- For bleak. A leash 10-15 cm long is quite sufficient, since fishing is carried out in the middle or surface layers of water.
- For roach. Depending on the type of equipment, the length of the leash varies from 15 to 30 centimeters.
- For bream. Bream need a long leader. If you have to fish in the bottom layer, the leash should be 25-30 centimeters long. Bream are often caught using bait lying motionless on the bottom. In such cases, a small pellet is installed in front of the hook at a distance of 5-10 centimeters, performing the function of a feeder. Having taken the bait in its mouth, the bream does not feel resistance, while the float rises and lies on its side, giving the angler a signal of a bite.
Expert opinion
Knipovich Nikolai Mikhailovich
Zoologist, hydrobiologist. I am interested in fishing at a professional level.
Attention! Monofilament fishing lines can be soft or hard. Rigid fishing line is more suitable for making leashes because it tangles less
Separately, it is worth mentioning leashes for catching predatory fish using float rigs. To catch perch with fry, fluorocarbon leashes with a single hook are used. To catch pike with live bait, use metal leashes made of soft leash material or thick fluorocarbon leashes. Hooks can be single, double or triple, depending on the fishing conditions.
Hooks for leashes should also be given close attention. Depending on the type of bait, hooks can be of different sizes, made of wire of different thicknesses, have a short or long shank, etc.
You can also find hooks of a specific shape, for example, carp hooks and red hooks. Hooks are produced with notches on the shank, designed to prevent the worm from slipping off the hook when casting and during fishing.
Training conditions
You should start training a dog only if it is in normal physical condition (not sick, not depressed and does not refuse food). It is better to feed the dog a couple of hours before, and take it for a walk just before practicing the commands, so that it does all the necessary things and slightly wastes energy, which will prevent absent-minded attention.
You should choose a secluded area for training - at the beginning of training, you do not want unnecessary noise and the presence of strangers, which the dog can be distracted by. It is better if it is a fairly spacious area in the fresh air that is familiar to the dog, with an even surface.
At first, it is better to avoid noisy places. Photo: Kate Hart
When the dog begins to make progress in mastering the command, you should slightly add distractions - change the training location or invite spectators. However, if the dog is very distracted, it is too early to leave the secluded training area.
What you need for training
To teach the “near” command, you will need a collar, a leash, treats for reward, and your favorite toy will also come in handy.
Training should be done daily for 15 minutes. If the dog is tired or distracted, it is best to stop training and continue the next day.
Which delicacy to choose
Treats for reward during training should be in the form of small pieces, not crumble and not get your hands dirty. You can only choose the most suitable treat for your dog through experience. These can be pieces of chicken, sausages, vegetables, fruits, cheese, dry food, and store-bought treats.
Industrially made treats for dogs
Some dogs willingly work for pieces of biscuits. The treat needs to be chosen so that it is desirable for your dog. It is better to choose several types of treats and alternate them periodically so that the dog does not get bored with them.
When to use a special collar
It is not always possible to teach a dog commands using ordinary techniques and equipment. If the dog is a fairly large breed, disobedient, hyperactive or aggressive, then a special collar can help you: a choke collar, a strict collar or an electronic collar.
All this ammunition requires knowledge of its practical use and special care in use.
When does a dog need a protective collar?
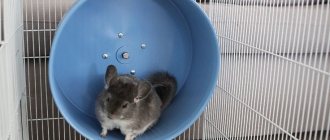
The animal instinctively tries to lick a fresh wound or scratch an itchy spot with its paw. Veterinarians strongly recommend wearing a post-operative collar for dogs to prevent them from accidentally harming themselves.
A protective device will be needed in the following cases:
The postoperative period requires time for the sutures to heal. Do not allow your pet to lick or scratch the wound to relieve pain and itching. The fastening threads may not hold up and come apart. And penetration of infection into the wound will lead to serious complications. Ophthalmic diseases are accompanied by itching and lacrimation. Medicinal ointments are applied to the eyes for a long time. The animal will try to scratch the itchy area with its paws and wash off the medicine
This is especially true for cataract surgery and other complex eye procedures, when it is very important to protect from mechanical damage. Ear diseases also cause itching and require the use of a veterinary collar. Injured limbs are put in plaster or splinted. The dog usually does not accept the foreign object and tries to remove it
Such actions can lead to disruption of the process of bone fusion and healing of periosteal tissues. Skin problems require aseptic conditions and the application of ointments: dermatitis, allergies, bacterial and fungal diseases. Animal intervention can spread the infectious agent to healthy areas of the body or aggravate the disease by scratching itchy areas. When treating wool against parasites, toxic drugs are used. Licking the fur after the procedure can lead to poisoning. The puppy bitch is protected if she thoroughly licks her nipples, causing milk production. Males are recommended to wear a collar after castration.
Does training success depend on the dog's breed?
As a rule, all dogs are trainable, regardless of breed and size; differences can only be in the speed of mastering the command. Some breeds (retrievers, poodles, German shepherds, papillons, shelties, Dobermans and Rottweilers) learn faster, some (chow-chows, bulldogs, Afghan hounds) take longer, but it all depends on the owner, his readiness and efforts in training the pet.
Also, the speed of learning can be affected by the characteristics of the pet - dogs with high activity are less able to keep their attention on the task at hand.
Noose knot strength
The noose is considered a fairly reliable and strong knot, but is rarely used in mountaineering. This is due to the fact that the knot is held only under constant load, and at the slightest weakening it can come undone. More often it is used where it is necessary to lift or move a heavy load, tie a snare, moor a boat, or connect several ropes.
The noose is widely used by tourists, fishermen, and hunters. It is knitted in a few seconds, and its strength largely depends on the material used and the type of knot.
How do you use this knot when hiking and fishing? Or do you have your own “favorite” nodes? Share your opinions in the comments.
How to tie a scaffold knot
This article will list all possible self-tightening loops that can be used for bondage and selfbondage. Running simple knot
Knitted in 3 movements, it is one of the simplest self-tightening knots. When pulling at the end, the loop is tightened; in order to increase the loop, when it is not yet very tight, you need to pull the loop in the opposite direction.
Sliding eight
Knitting this loop is not difficult at all, so you shouldn't have any problems with it. In general, such a knot is usually used when tying bags or the like, but we can use it, for example, to tie legs or arms.
Sliding blind loop
It is also knitted in 3 stages, first we fold the rope in half, then, as shown in the picture, we pass the ends into a loop and then tighten it. You can use this knot as a noose for rope handcuffs.
Running bowline
Knot of medium complexity. It is based on the lasso principle. Often used in maritime affairs, for catching logs and anchors.
Silk knot
The snare knot is used by bird catchers. The knot is considered one of the smoothest and easiest knots to tighten.
Scaffold node
The name of this node speaks for itself. It was used in ancient times for hanging, but we can use it for our binding works.
Tightening noose
Like the previous knot, it is called a scaffold or gallows knot. As you already understood, it was used for hanging.
To tie this knot, the cable is laid in the form of two loops of equal size. Both loops are surrounded several times with the running end of the cable, after which this end is passed into the loop facing the root part of the cable and, pulling out the outer loop, is clamped in it. A tightening noose can always be easily untied by pulling the main part of the cable.
Drunk and shackled
Drunk on the left and shackled on the right.
These two knots are almost similar; when you tie them, you get 2 tightening loops or, more simply, self-tightening handcuffs.
1 review to “Tightening loops”
MAGICALLY. WHAT KIND OF ROPE DO YOU NEED? THE LINEN IS OBVIOUSLY TOO THIN, IT WILL CUT YOUR HANDS AND LEGS.
Sea knots. Tightening loops
In the picture: a running simple knot.
RUNNING SIMPLE NODE. The simplest knot that forms a tightening loop. When pulling on the root end, the loop is tightened, but it can be increased in size by pulling the running end away from the loop. The knot can be tied in any part of the rope. With its help, you can attach a cable to something and moor the boat by a pile.
In the picture: sliding figure eight.
SLIDING “FIG EIGHT”. Based on the figure-of-eight principle, this knot belongs to the category of reliable, tightly tightened loops. It has the property of being tightened smoothly and evenly when pulled at the root end.
In the picture: a sliding blind loop.
SLIDING BIND LOOP. Tying a knot is extremely simple and does not require any explanation.
In the picture: a running bowline.
RUNNING BOWLINE. The same arbor knot with a small loop into which the root end is passed. Based on the lasso principle, it works flawlessly. In maritime practice, they are used to search for and lift Admiralty anchors left at the bottom.
In the picture: a power unit.
POWER KNOT. Borrowed from the simple technique of bird catchers. It is considered one of the most smoothly and easily tightened knots.
In the picture: scaffold assembly.
SCAFFOLD UNIT. Its name speaks volumes about its purpose. One of the ancient knots, developed by the centuries-old practice of the death penalty by hanging. But it can be successfully used for many other purposes. For example, for temporarily attaching a cable to various objects.
In the picture: a tightening noose.
PROTRACTING NOZZLE. Like the previous one, this knot is called the “scaffold” or “hanging” knot. But, despite this, it also finds its application in maritime affairs. It is used when temporarily securing a cable to objects floating in the water or when throwing and securing a cable to an object on the shore.
This knot has an advantage even over such a good knot as a noose with half bayonets; in it, the running end of the cable cannot be whipped out of the loop, and therefore a tightening noose is considered more reliable. On sailing ships, this knot was used to fasten the main ends of topsail sheets, topsail sheets and other gear in cases where it was necessary to have these ends ready for release.
To tie this knot, the cable is laid in the form of two loops of equal size. Both loops are surrounded several times with the running end of the cable, then this end is passed into the loop facing the root part of the cable and, pulling out the outer loop, is clamped in it. A tightening noose can always be easily untied by pulling the main part of the cable.
This node can be used in two ways. Firstly, according to its knitting pattern, it is convenient to store the cable in the form of a compact coil. By tying this knot without a loop at the running end of the throwing end, we get excellent ease. If it does not seem heavy enough, you should lower it into water before use.
DRUNK KNOT. This section of knots contains knots with two tightening loops. When the running and main ends are pulled simultaneously, the loops are tightened. From time immemorial, this knot was called a drunken knot, apparently it was used to pacify excessively riotous sailors, putting loops on the wrists behind their backs, and tying the ends on the chest.
In the picture: shackle knot.
SHANDEL KNOT. Very similar to a drunken knot. Its name in English means “handcuffs”. Can serve the same purpose as a drunken knot. But despite the external similarity, these are two different nodes. In any case, without untying them and without removing the ends from the central loop, it is impossible to turn one knot into another. Some sailors call this knot a “double masthead knot” because it is sometimes used in a similar way to the masthead knot.
Source